Overview
Datasource Management is the central hub for creating, configuring, and maintaining data connections within Datanyx. It enables users to import data from various sources including spreadsheets, databases, and external applications, forming the foundation for all reporting and analytics activities.
This section allows users to:
- Create new datasources from multiple source types
- Configure and update existing datasource connections
Datasource Creation
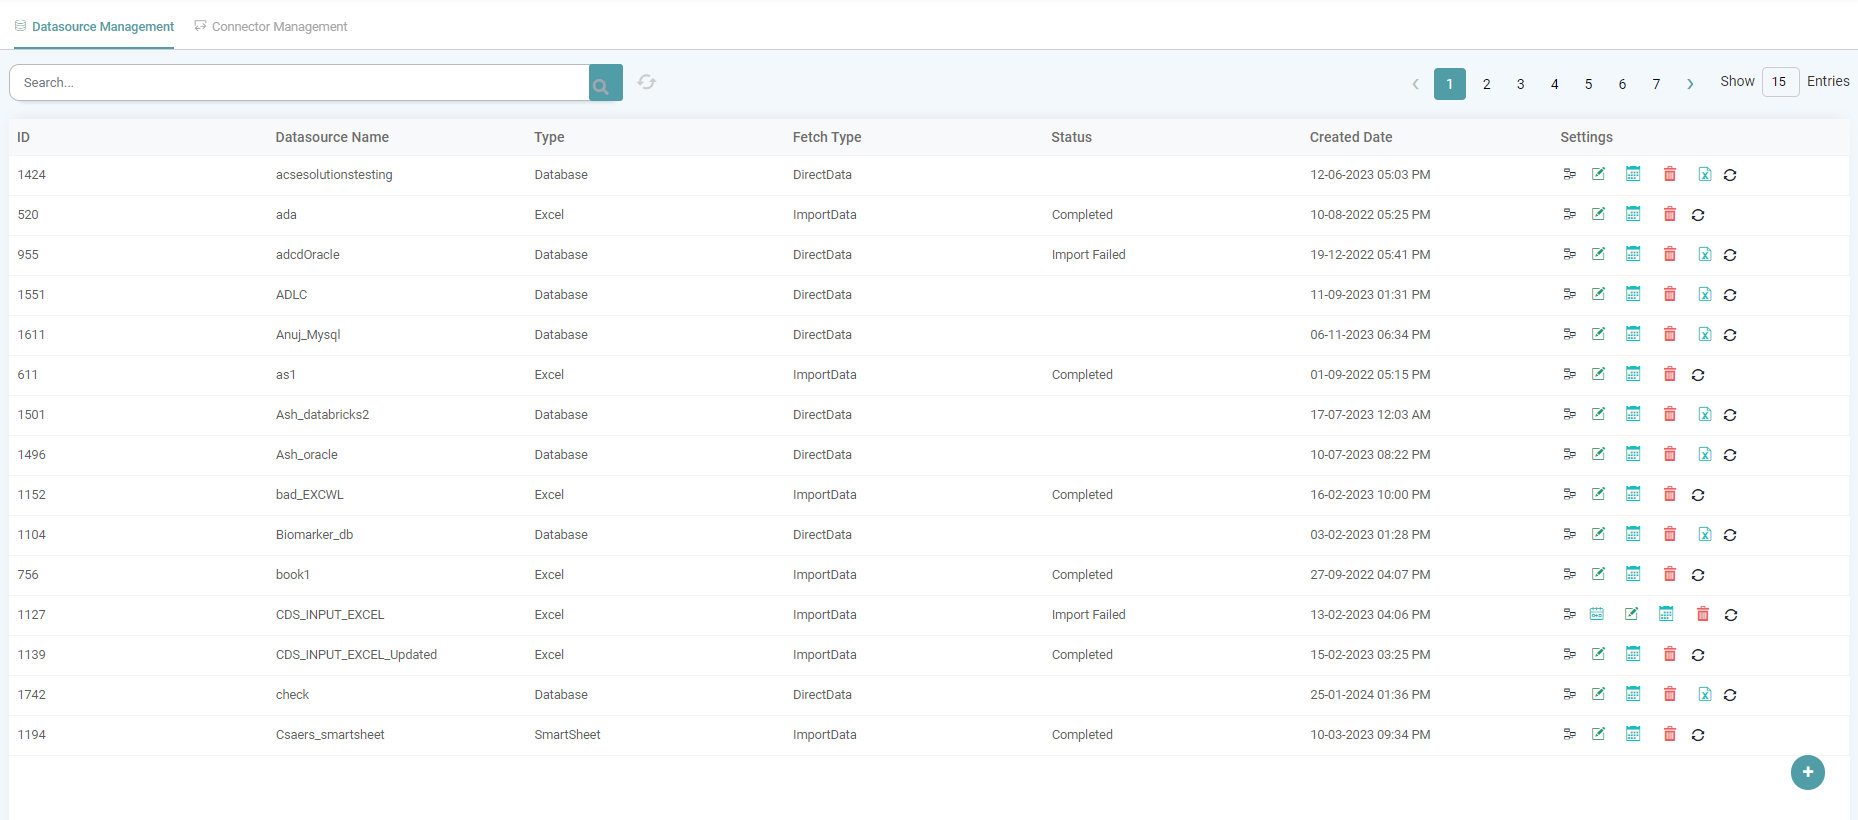
Step 1: Various Data sources that have been created can be managed in this section.
Step 2: In the Main Navigation Bar, click on ‘Datasource’.
Step 3: Click on the Datasource Management tab to add/ see the list of Data sources. (Refer to the image below).


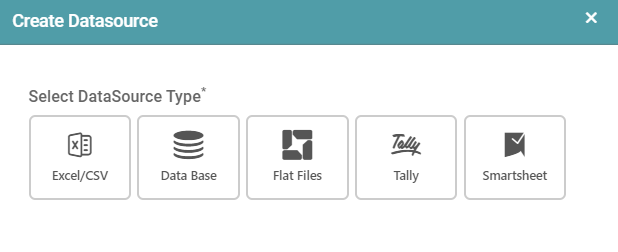
Step 4: Click on the add icon, located in the bottom right of the screen to Create a Datasource.
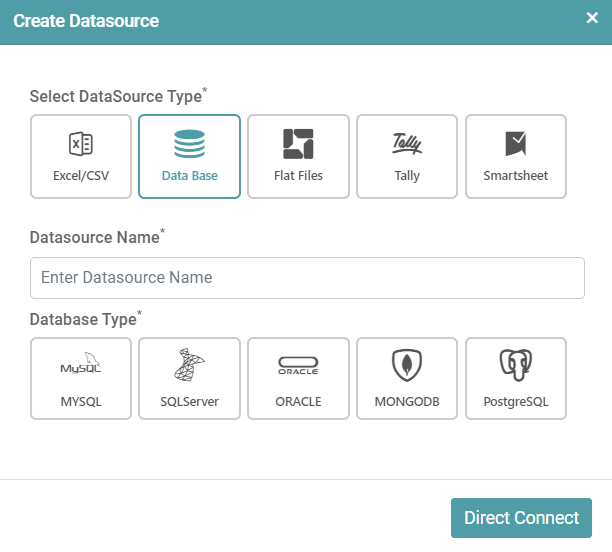
Step 5: Enter the details in the pop-up screen.
Step 6: Datasource Name – Provide an appropriate Datasource name.
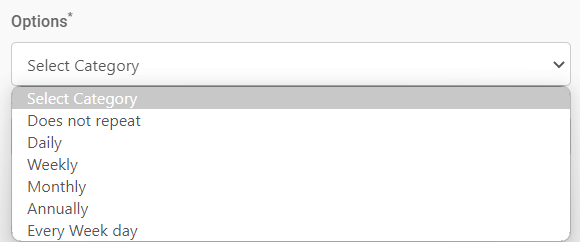
Step 7: Click on Datasource type to select one of the following options:
| Datasource Type | Description |
|---|---|
| Excel/CSV | Import data from spreadsheet files |
| Database | Connect to databases |
| Flat Files | Import data from flat files |
| Tally | Connect to Tally accounting software |
| Smart Sheet | Connect to Smartsheet |
(Refer to the image below).
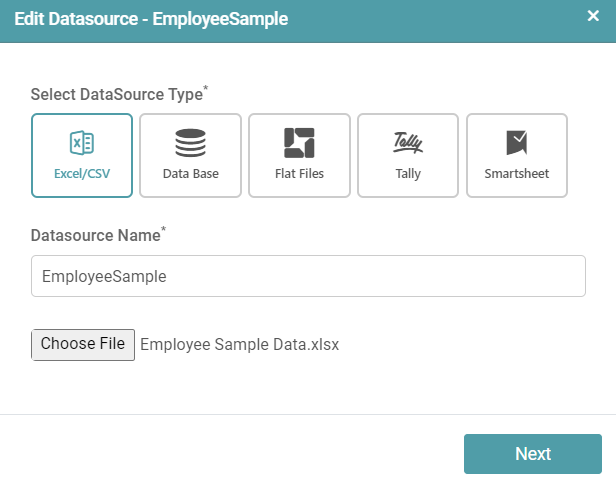
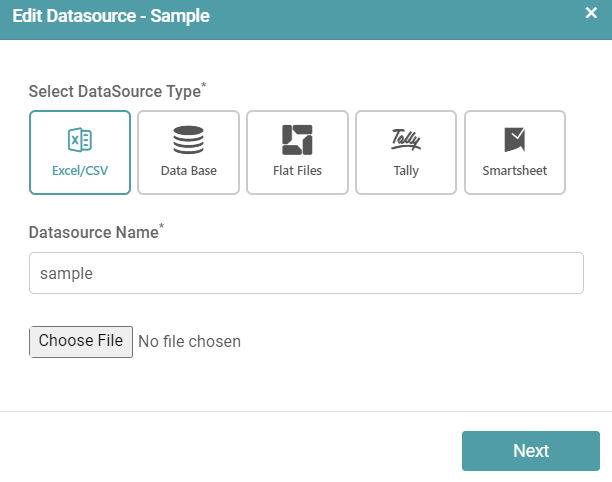
Datasource Creation with Excel/CSV Datasource Type
Step 1: Click on the add icon, located in the bottom right of the screen to Create a Datasource.
Step 2: Enter the details in the pop-up screen.
Step 3: Datasource Name – Provide an appropriate Datasource name.
Step 4: Click on Excel/CSV from Select Datasource Type. You can select a new excel/ csv file or choose from an existing file.
Step 5: To create a new file, enter a data source name and click on choose file. (Refer to the image below).
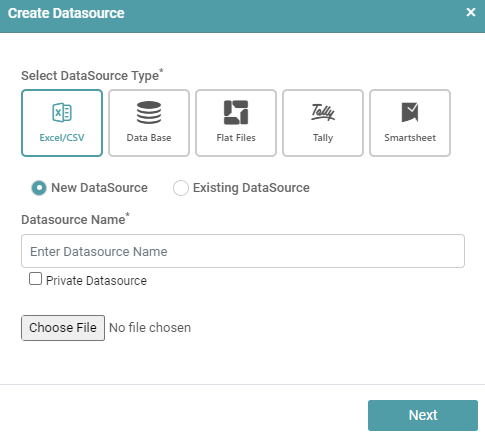
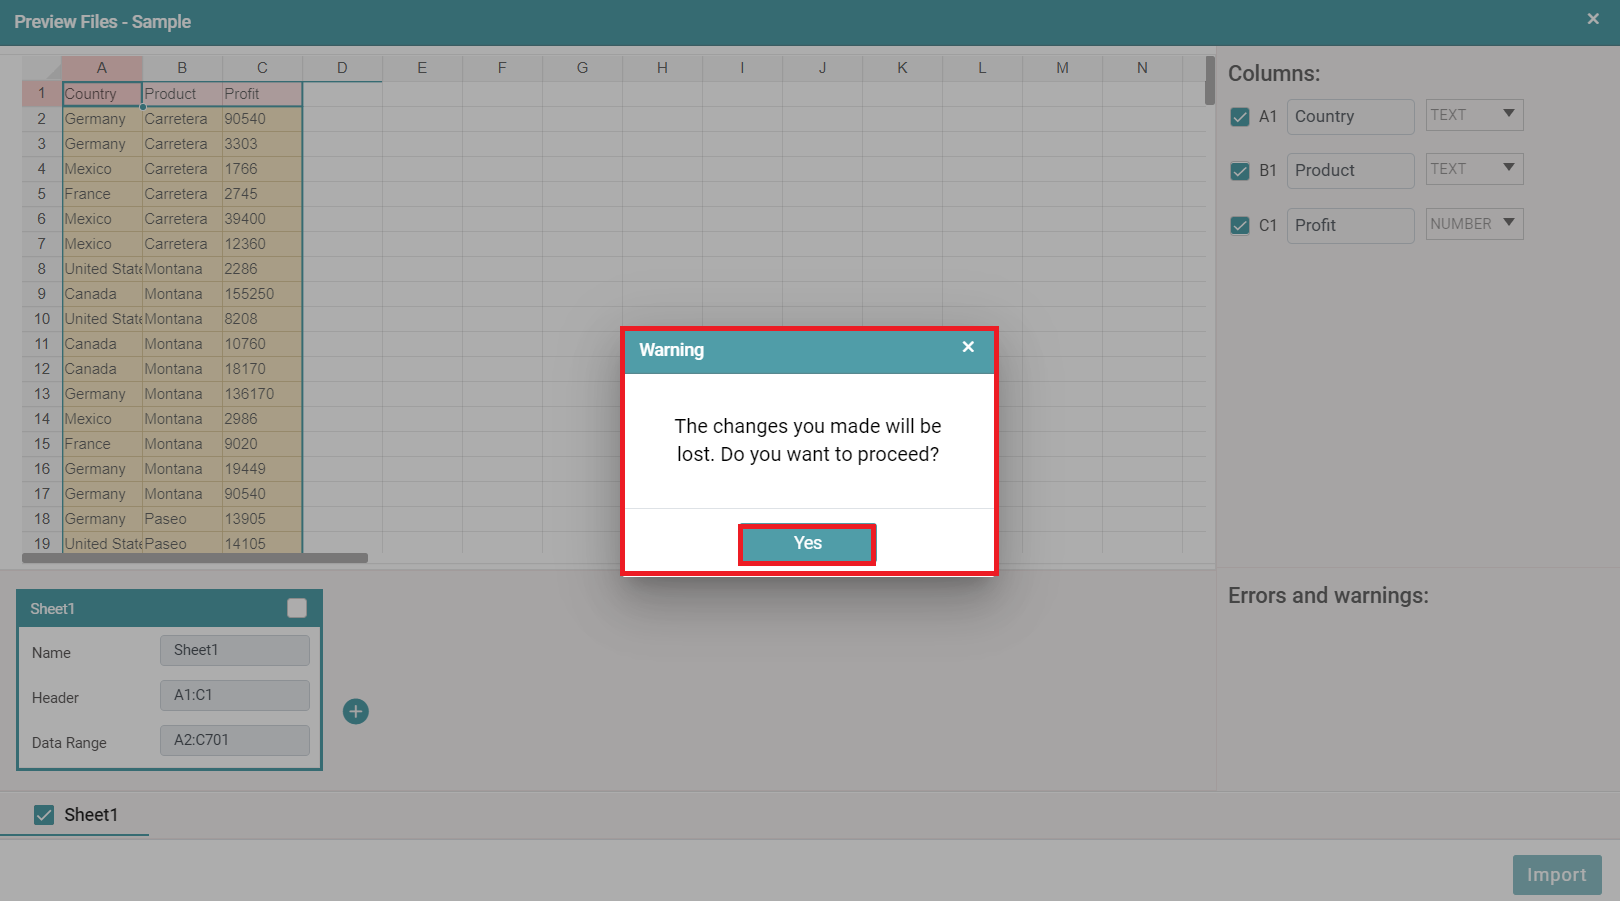
Step 6: In the open dialog box that appears, enter the name of the file and click open. Now click on next.
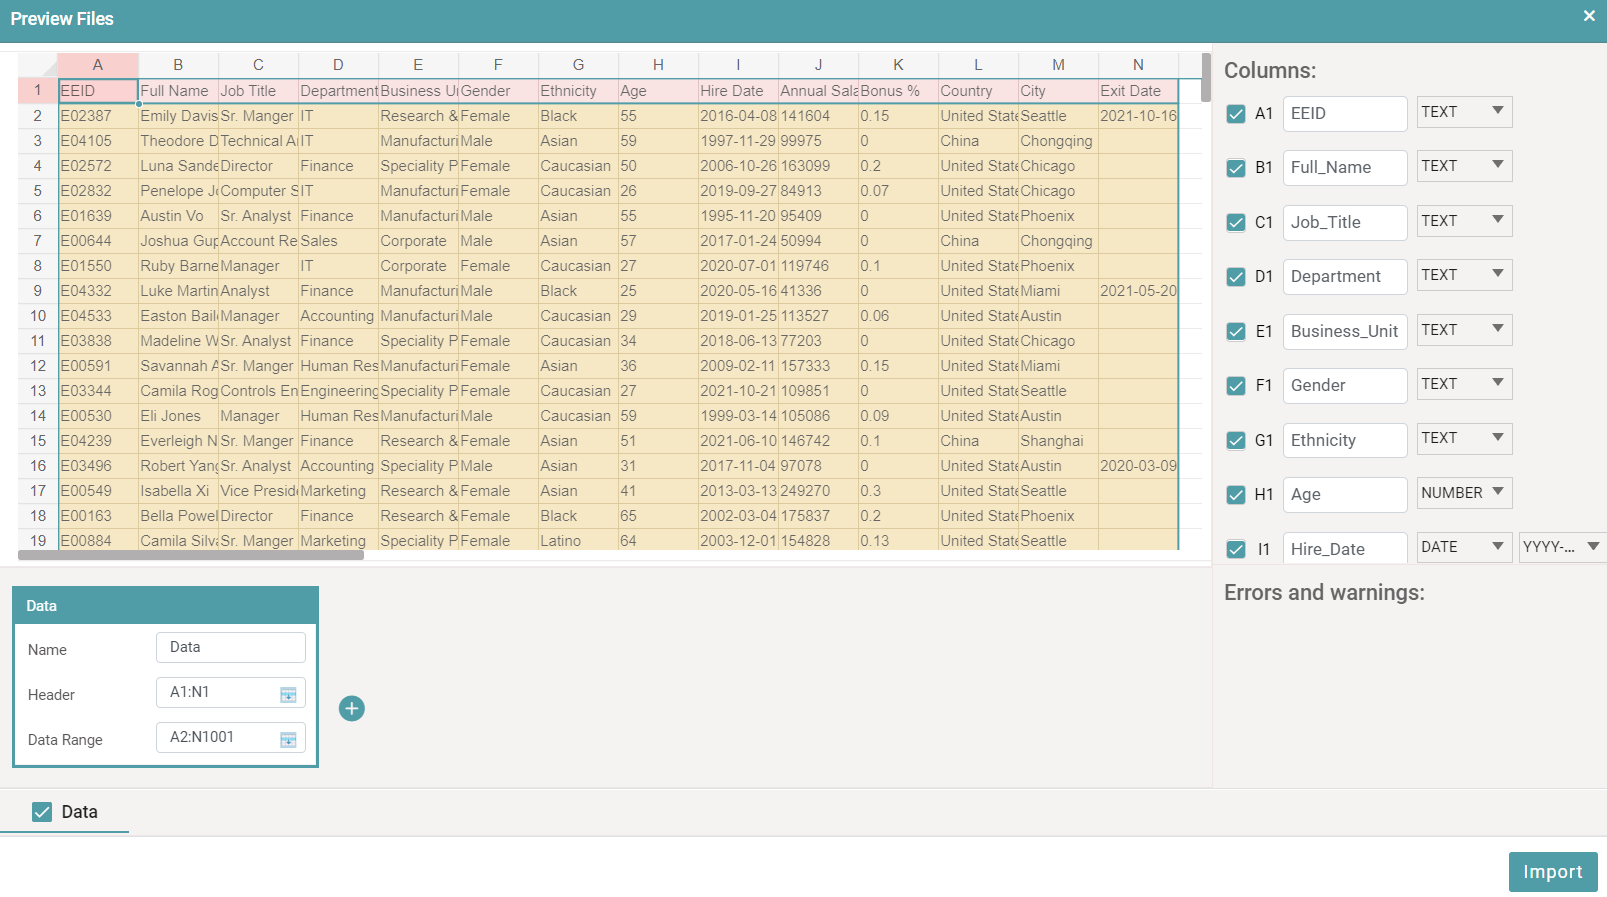
Step 7: A preview of the desired file is shown.
Step 8: Select the checkbox and click on import. (Refer to the image below).
Step 9: The newly created data source will be added to the Datasource List and the status of the imported data will show as complete. (Refer to the image below).

Datasource Creation with Database
Step1: Enter the Datasource name and select Database type from the dropdown. (Refer to the image below).
Step 2: Select the Datasource type: Data Base.
Step 3: Select the Datasource type from the various options:
DATANYX Server
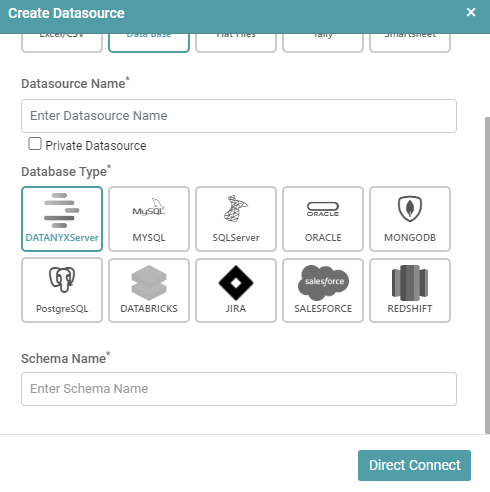
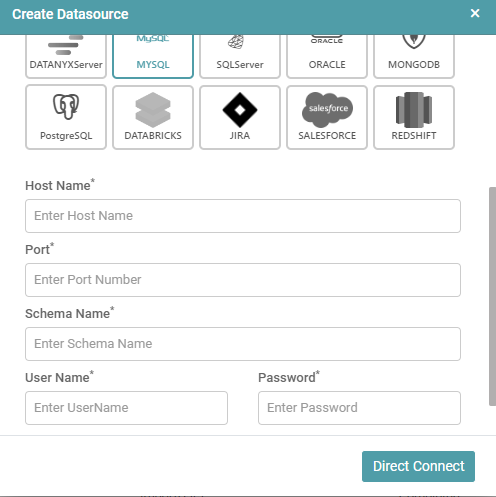
MYSQL
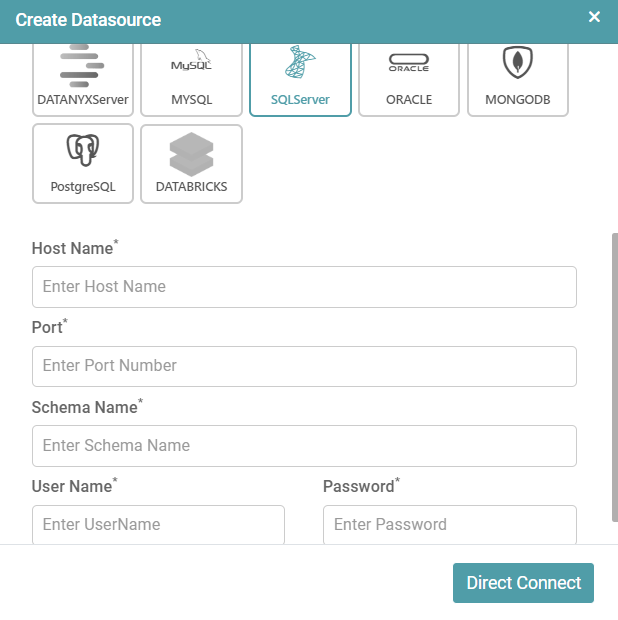
SQL Server
ORACLE
MONGODB
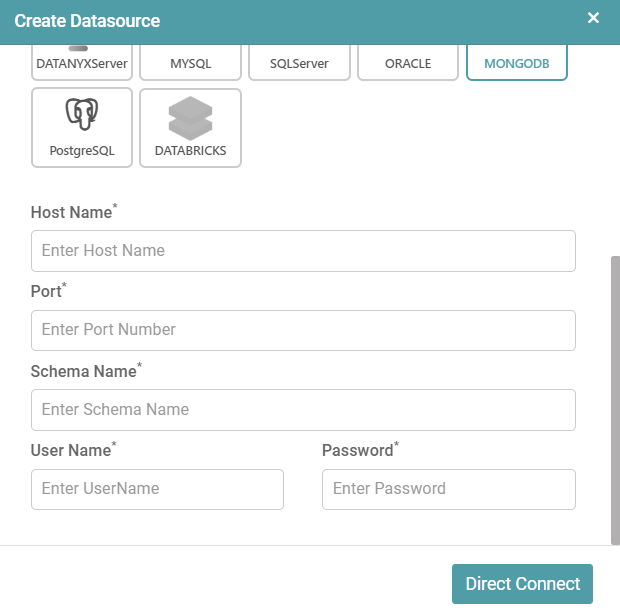
PostgreSQL

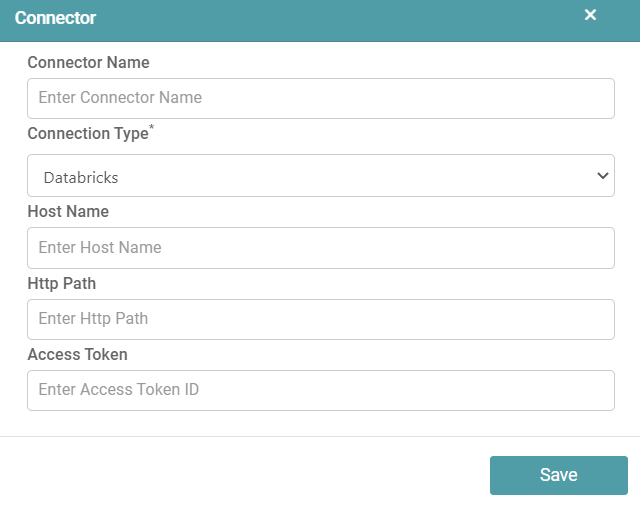
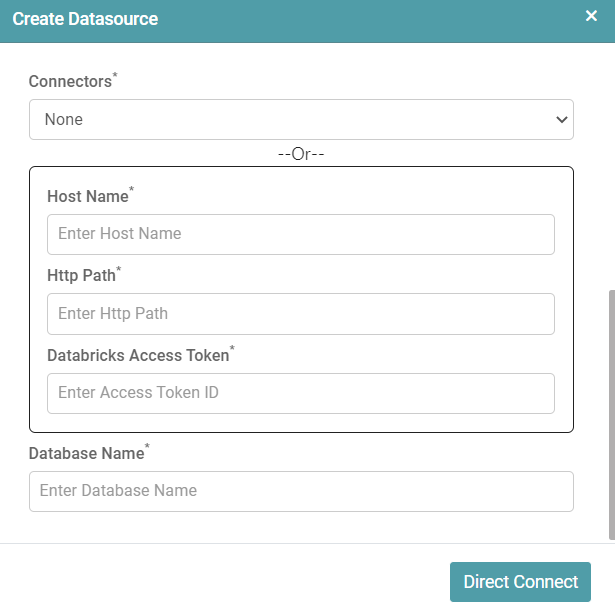
DATABRICKS
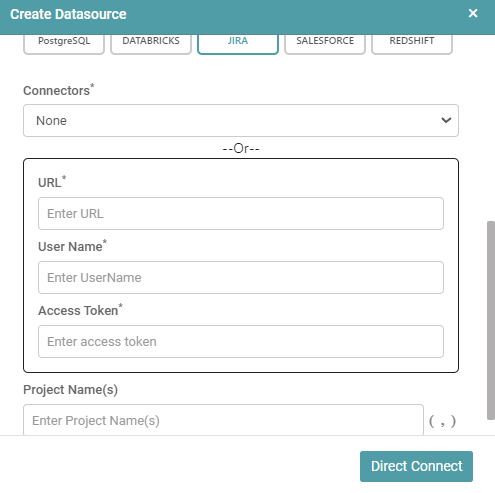
JIRA
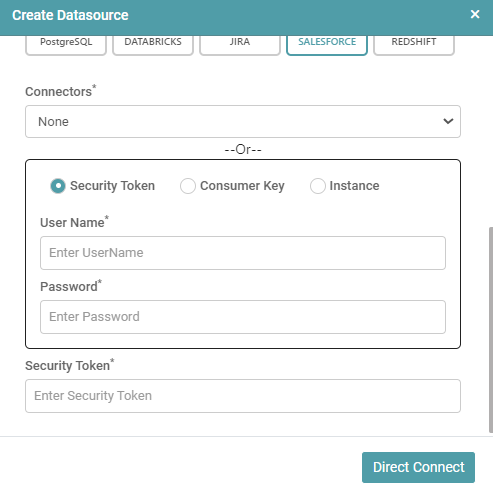
SALESFORCE
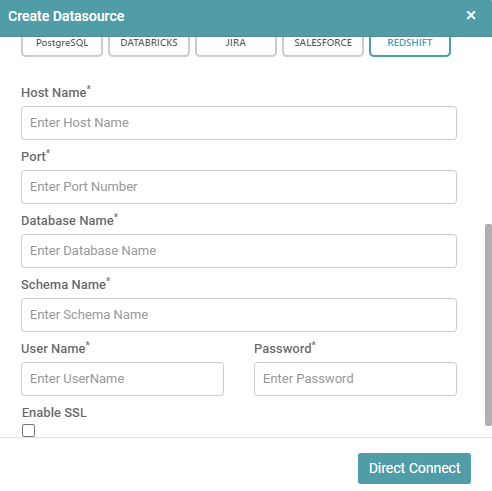
REDSHIFT
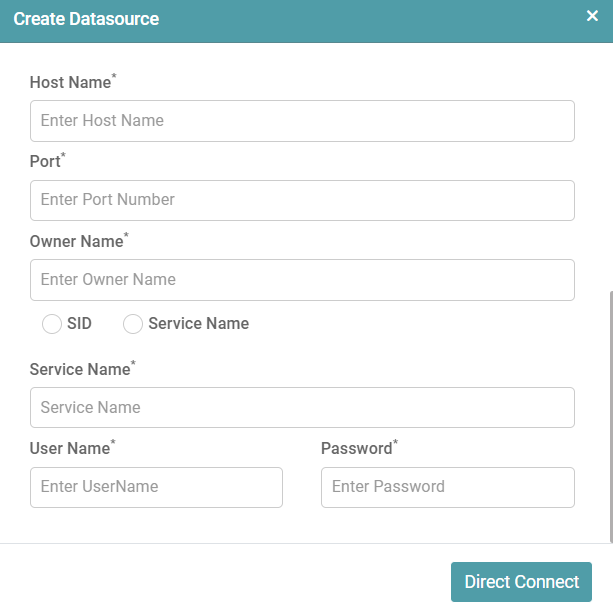
Step 4: Enter the Host Name.
Step 5: Enter the Port Number.
Step 6: Enter the Owner Name. Select SID or Service Name radio button (Only Oracle DB).
Step 7: Enter Database Name (Only PostgreSQL).
Step 8: Enter the Schema Name.
Step 9: Provide the Username: While creating the database, it will be accessed through a Username. Enter that Username in this column.
Step 10: Provide the Password: While creating the database, it will be accessed through a Password. Enter that Password in this column.
Step 11: Choose Direct Connect, and this will directly connect to the data source, and the user cannot make any further changes.
Step 12: If you click on Direct Connect. Then Success pop will appear. Click the Ok button.
Step 13: The data source is added to the Datasource list.
Datasource Settings
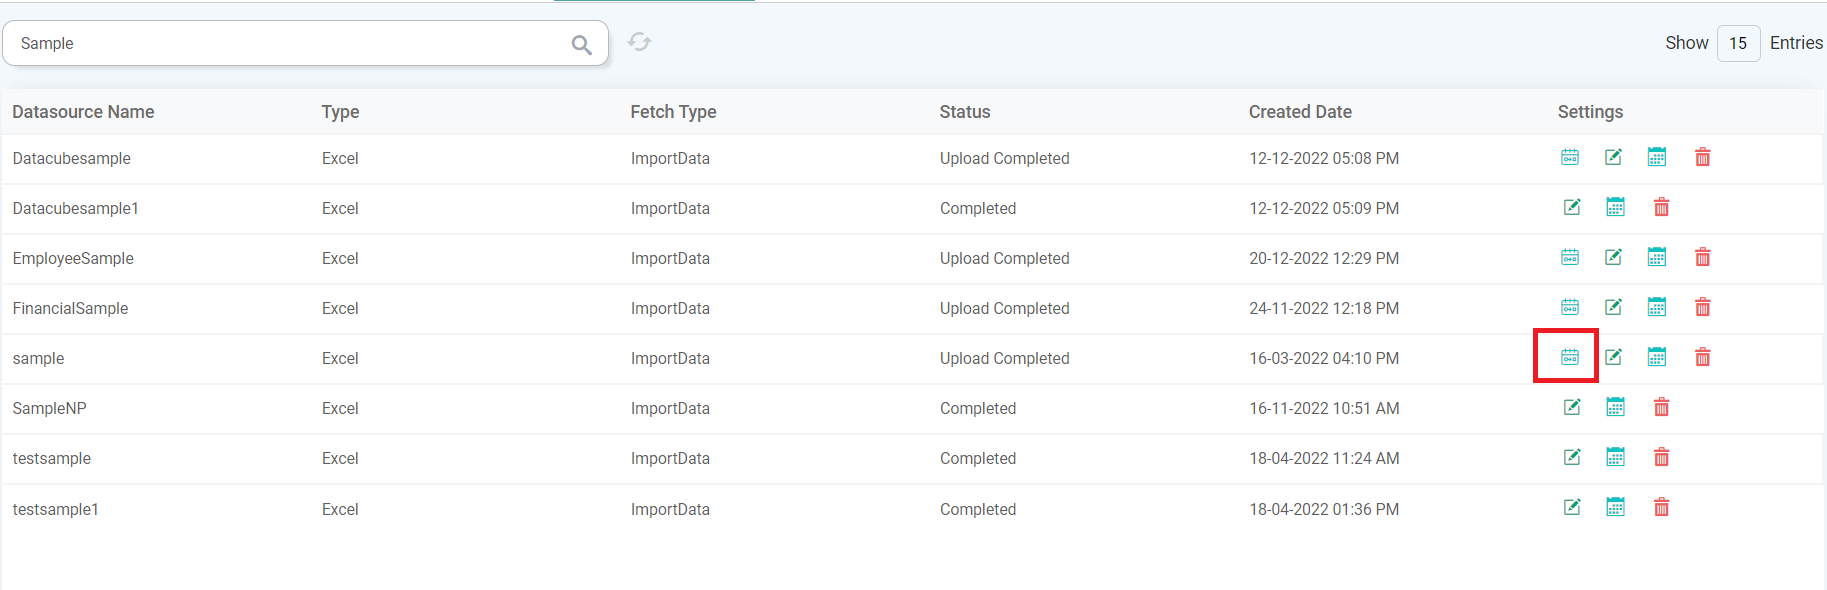
Step 1: In the Main Navigation Bar, click on ‘Data Source’. Click on the Datasource Management tab to add/ see the list of Data sources.
Step 2: Datasource Management has the following columns:
- ID: This shows the Datasource Id.
- Datasource Name: This column shows the name of the Datasource given at the time of creation.
- Type: This column shows the type of Datasource uploaded.
- Fetch Type: This column shows the method by which the data was uploaded.
- Status: Shows the status of the Datasource like Completed/Import in progress.
- Created Date: This shows the date the file has been created on.
- Settings: This column shows the Data Model, Edit, Schedule, Delete and Configure options. (Refer to the image below).
Data Model
Click on this link to learn how to create a data model.
Edit
Append/ Override
Step 1: Click on Edit and you will be able to perform two operations.
- Append
- Override
Step 2: To perform the append operation, click on Edit and then choose file. Click on the next button. (Refer to the image below).
Step 3: The preview file popup appears. Click on the checkbox located at the bottom left of your screen.
Step 4: Select the checkbox at the bottom left of your screen. You have two options and those are ‘append and override’. Select the append or override radio button.
Step 5: Scroll down and in Data Range, click on the Edit icon. Now, that icon looks like an arrow. (Refer to the images below).
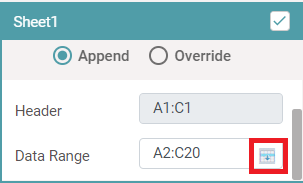
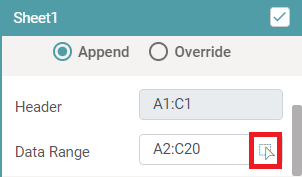
Step 6: You can select the data in the Data Range.
Step 7: When you select the data in the sheet, then the data is updated in the Data Range. (Refer to the image below).
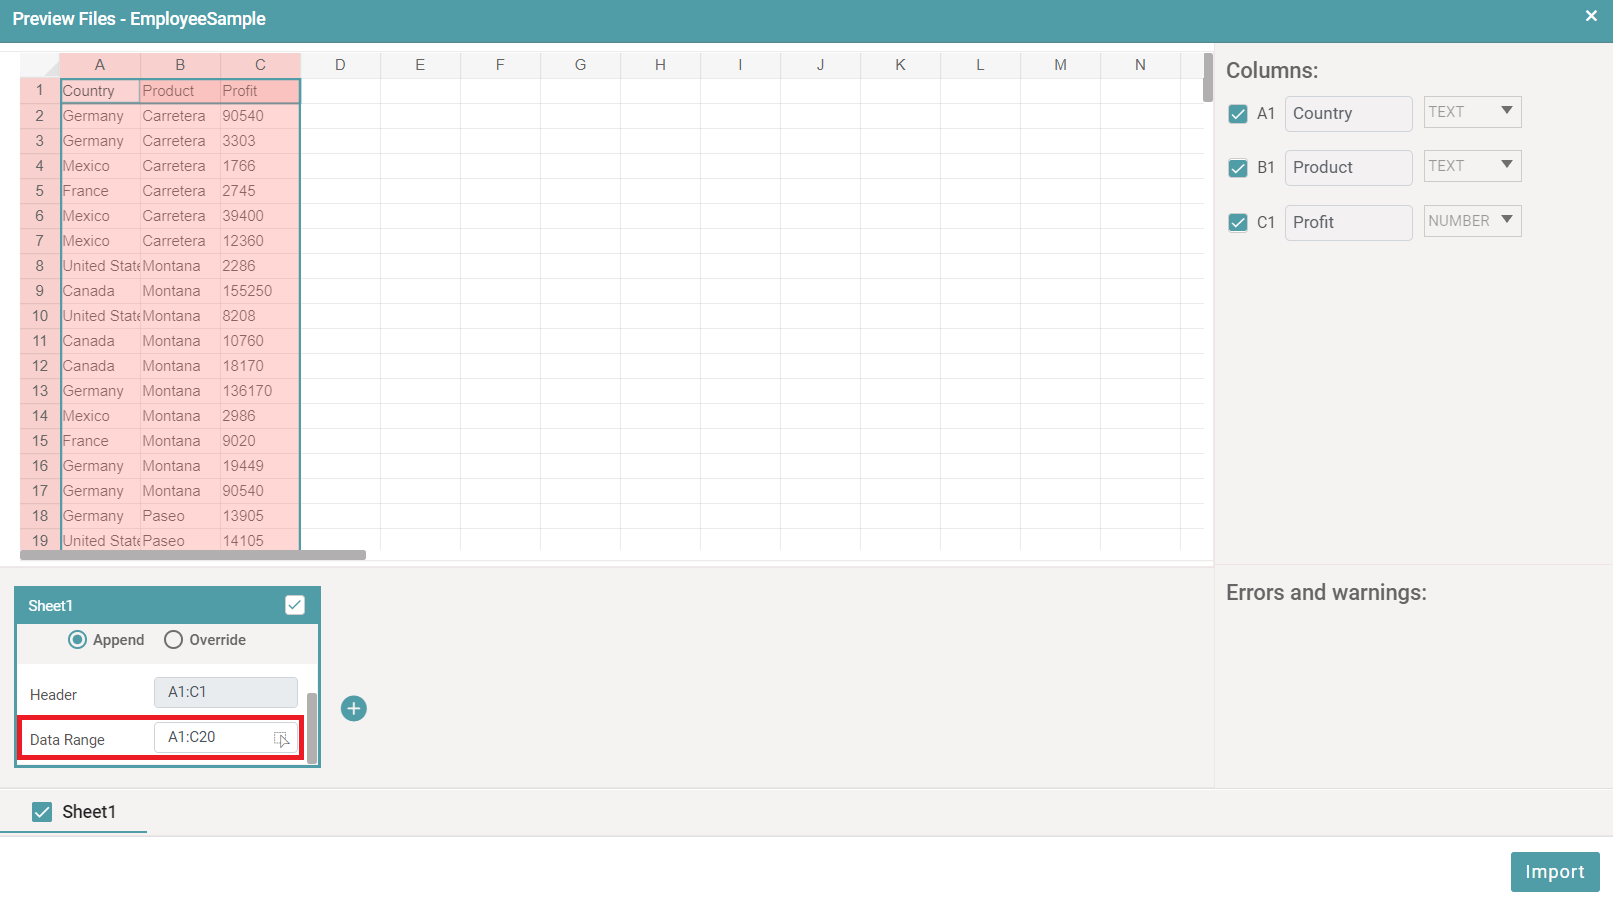
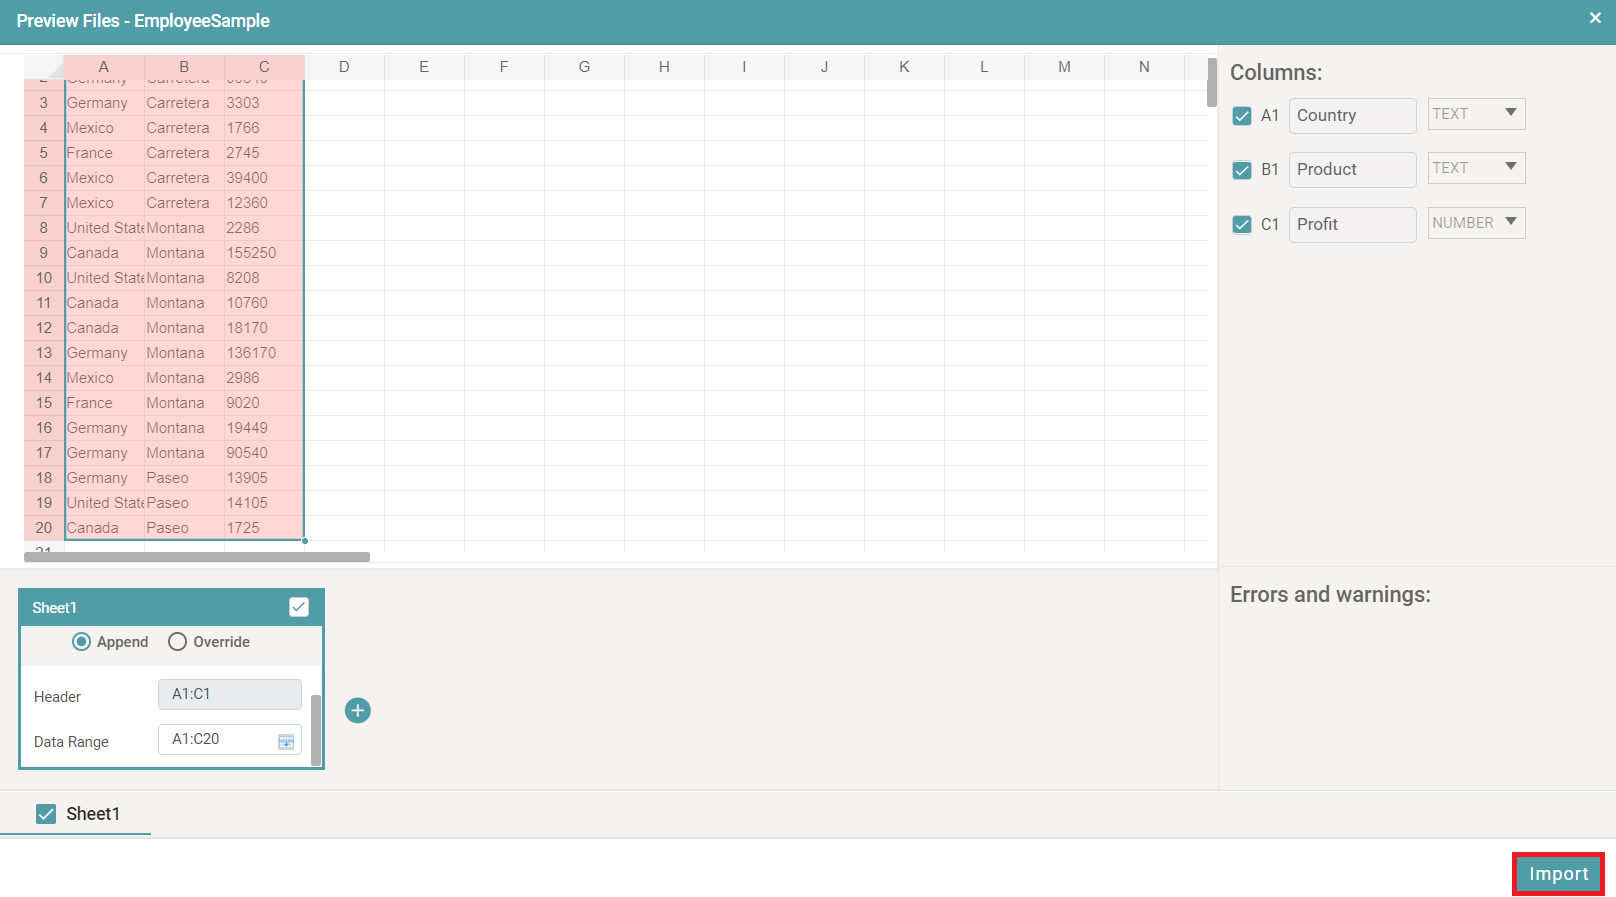
Step 8: After selecting the data, click on the arrow icon in data range. The arrow icon will be converted into the edit icon.
Step 9: Click on Import. (Refer to the image below).
Step 10: The status of the Datasource will be shown as Import in progress. Click on Refresh.
Step 11: After clicking on Refresh, the Datasource is updated with appended data and the status will be shown as Completed.
Schedule
Step 1: You can click on the schedule icon that is available under settings.
Step 2: A schedule dialog box pops up. (Refer to the image below).
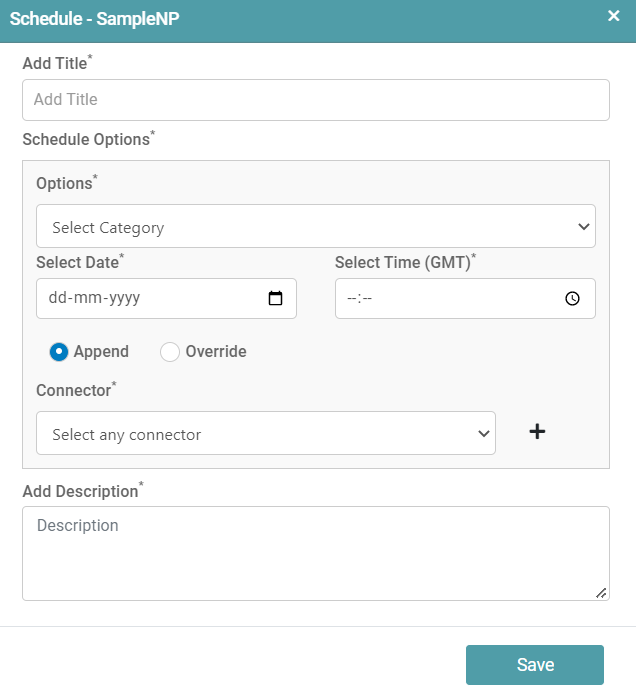
Step 3: You can add the title and schedule the discussion/ meeting with respect to that particular data. (Refer to the image below).
Step 4: The time, the date, connector and description can also be added. The user has the option to append or override the data, if necessary, by clicking on the append and override radio buttons.
Step 5: Click on the save button.
Delete
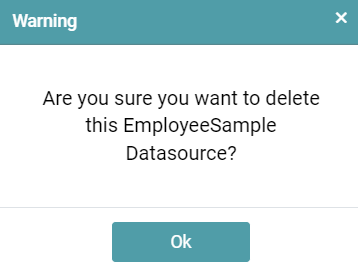
Step 1: Click on the delete icon to delete the Datasource.
Step 2: You will see a warning pop-up. Click on OK in the Warning popup. (Refer to the image below).
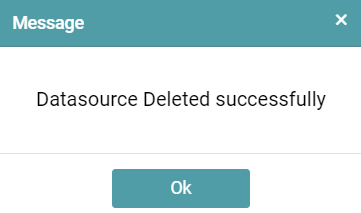
Step 3: You will see a message that the Data Source has been deleted successfully. (Refer to the image below).
Configure
Step 1: In the Main Navigation Bar, click on ‘Data Source’. Click on the Datasource Management tab to add/ see the list of Data sources.
Step 2: Click on Edit and then choose file. Click on the next button. (Refer to the image below).
Step 3: Now, click on the close icon in preview file popup.
Step 4: A warning pop-up appears. Click on yes. (Refer to the image below).
Step 5: The configure icon is available under settings now. (Refer to the image below).
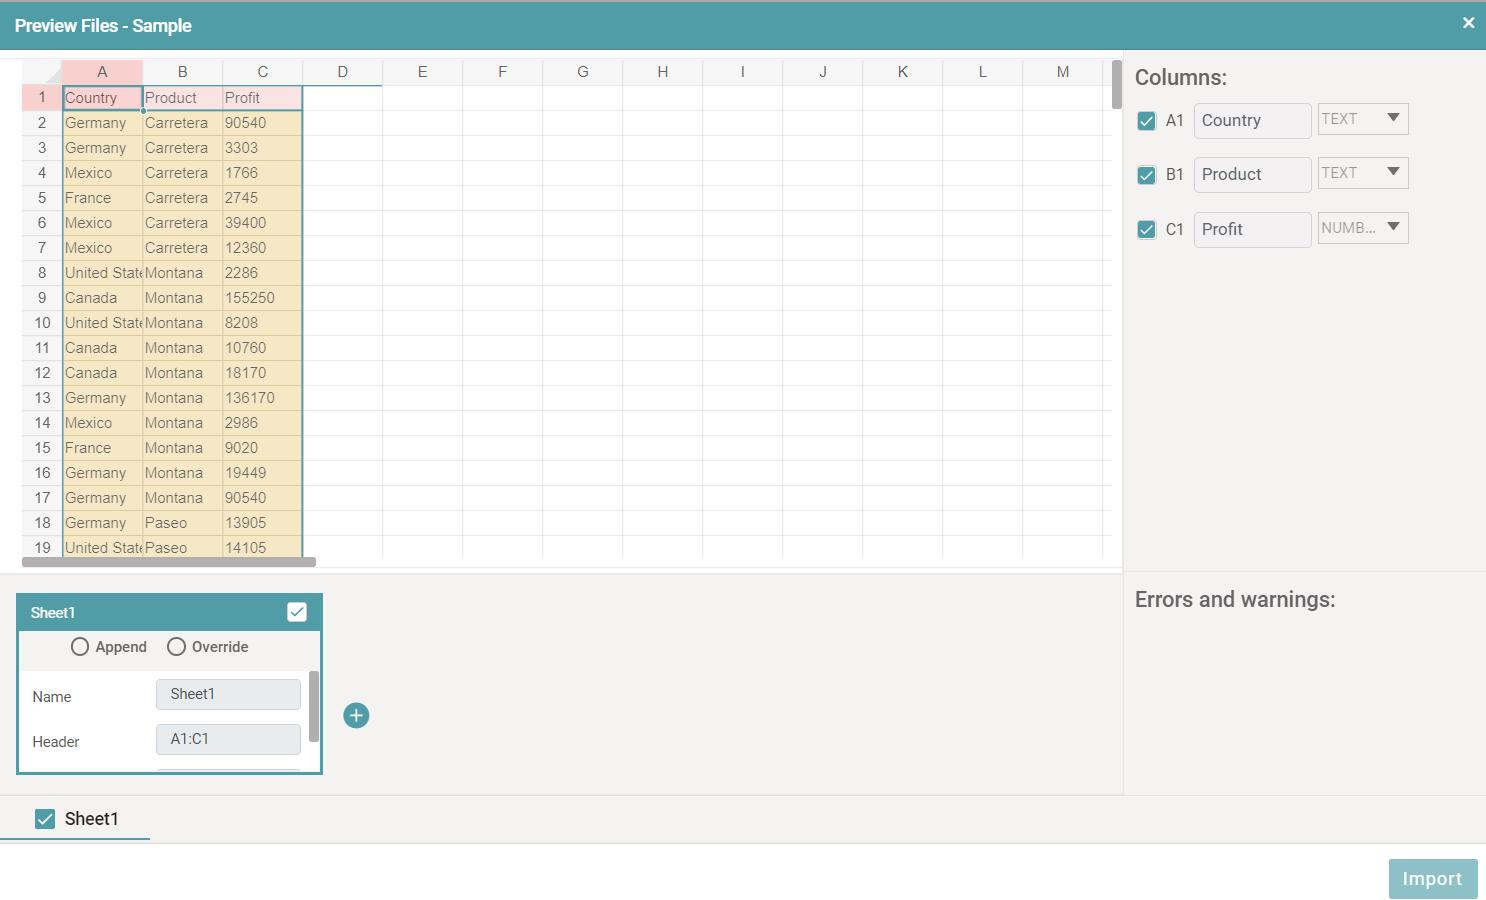
Step 6: When you click on the configure icon, the preview files pop-up appears. Now, you are able to edit the file. (Refer to the image below).
Search
Step 1: In the Main Navigation Bar, click on ‘Data Source’. Click on the Datasource Management tab to add/ see the list of Data sources.
Step 2: In the search tab, enter the data source name. The data source with the text entered will be shown in the list. (Refer to the image below).
