Schedule a Job
The user can schedule jobs. The scheduled report can be shared with the other users based on the schedule fixed.
Step 1: On the main navigation bar, click on Scheduler.
Step 2: The Scheduler has two tabs to choose from. They are –
- Jobs
- Audit
Jobs
The user can schedule jobs by following the steps given below:
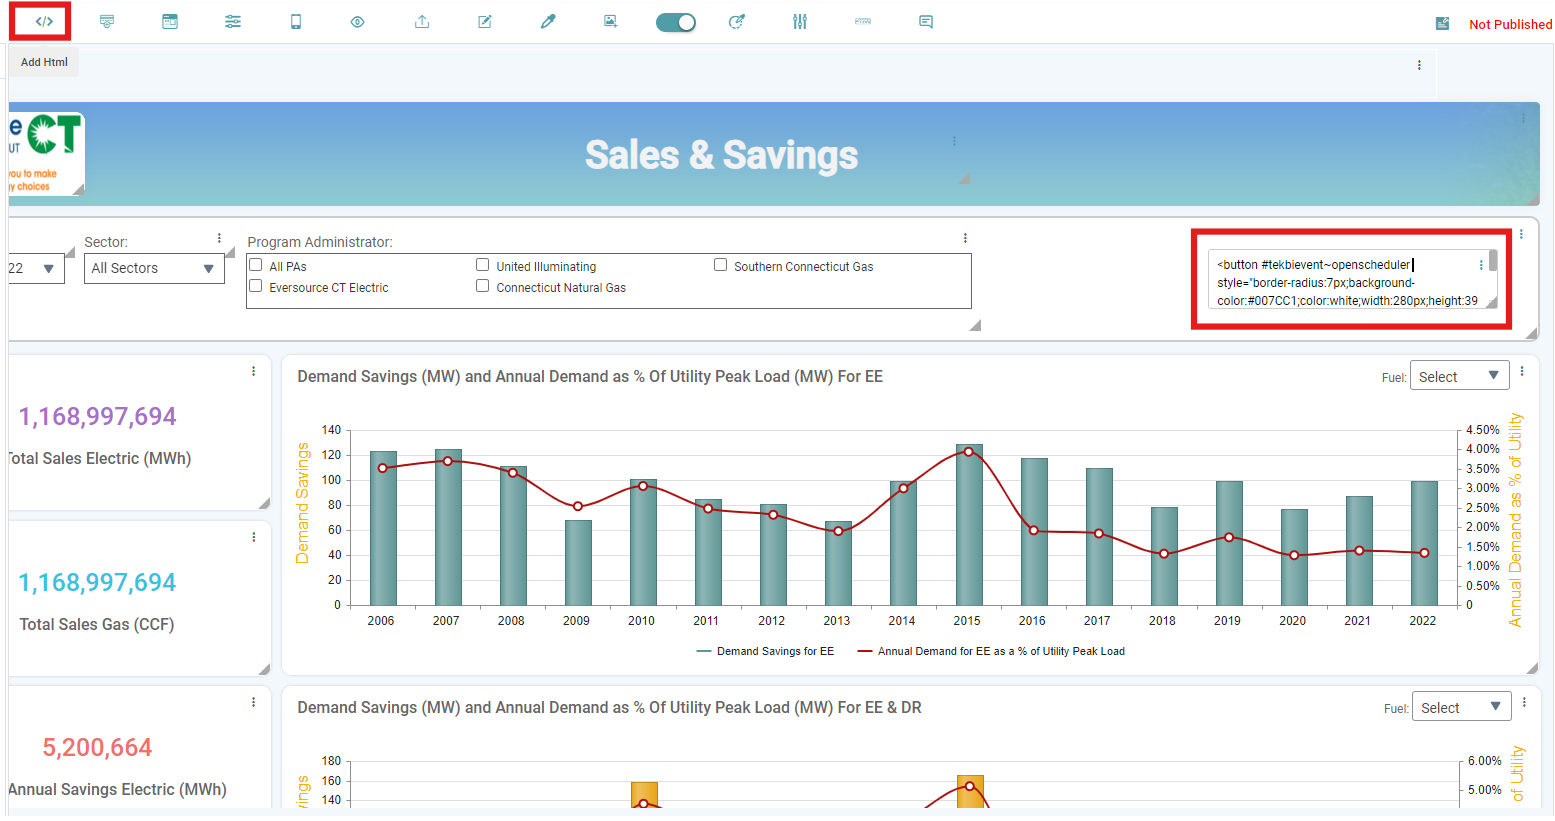
Create a Report. Next, click on the “Add HTML” button and insert the following HTML code to create a scheduler button or Click on the add icon in the Scheduler page.
From HTML Code
<button #tekbievent~openscheduler style=”border-radius:7px;background-color:#007CC1;color:white;width:280px;height:39px;font-style:normal;font-family:’Nunito’ !important;font-size:16px;font-weight:600;letter-spacing:0.03rem;gap:10px;text-transform:uppercase;line-height:20px;padding:9px 18px;”>Open Scheduler</button>
Note: You can customize the button’s formatting to suit your needs.
(Refer to the image below).


Step 1: After pasting the HTML code, press Enter. You will now see the Scheduler Button. (Refer to the image below).
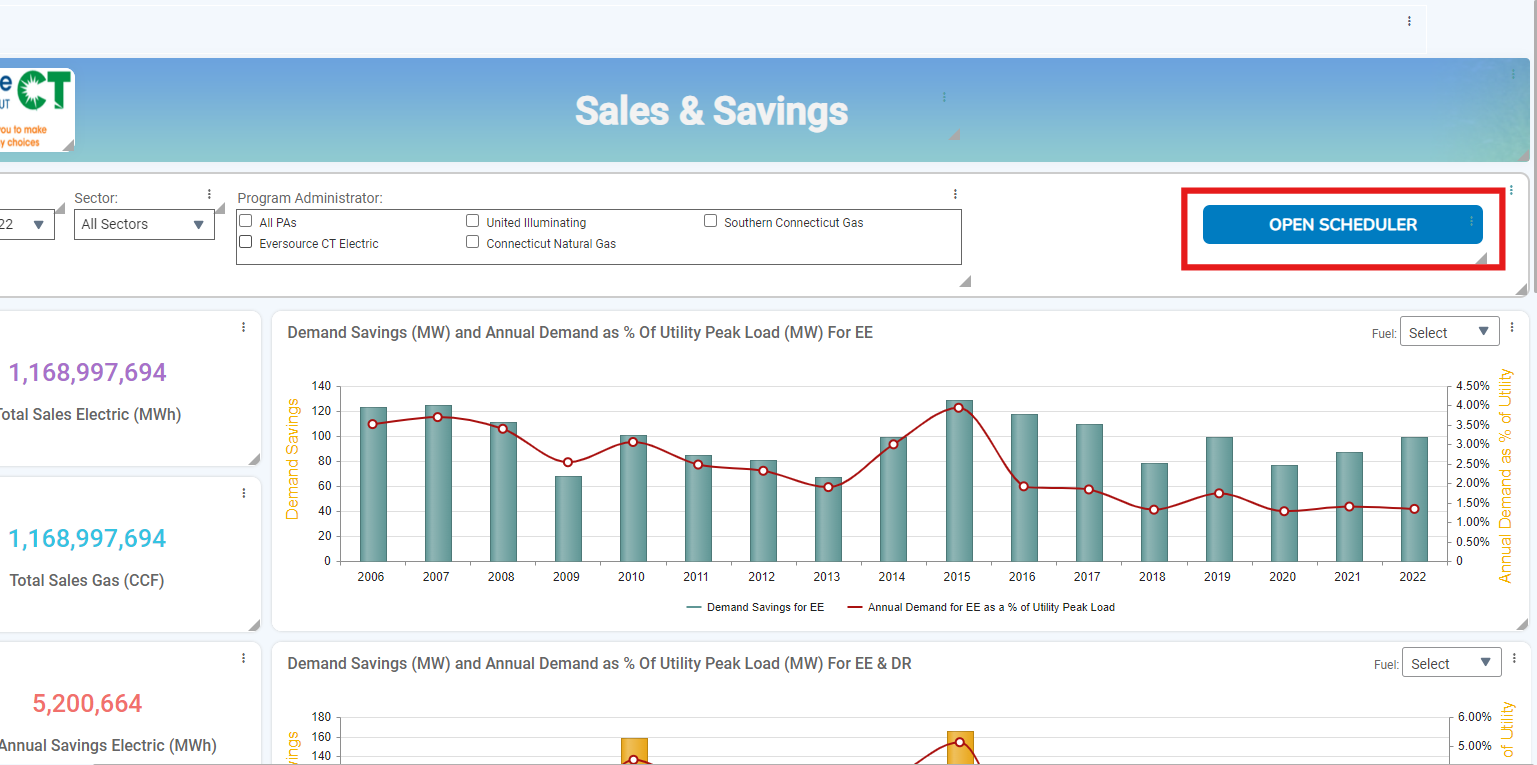
Step 2: Now, navigate to the Dashboard and click on the schedule button to schedule the current report. The New Schedule pop-up appears.
Step 3: Here, you can enter the Schedule Name, choose the File Type (CSV, Excel, or PDF), set the Frequency (Daily, Weekly, Monthly, Adhoc), specify the Timing, select the Schedule Start Date, and set the Schedule End Date. If there is no end date, click the “No End” checkbox. Then, click the “Next” button. (Refer to the image below).

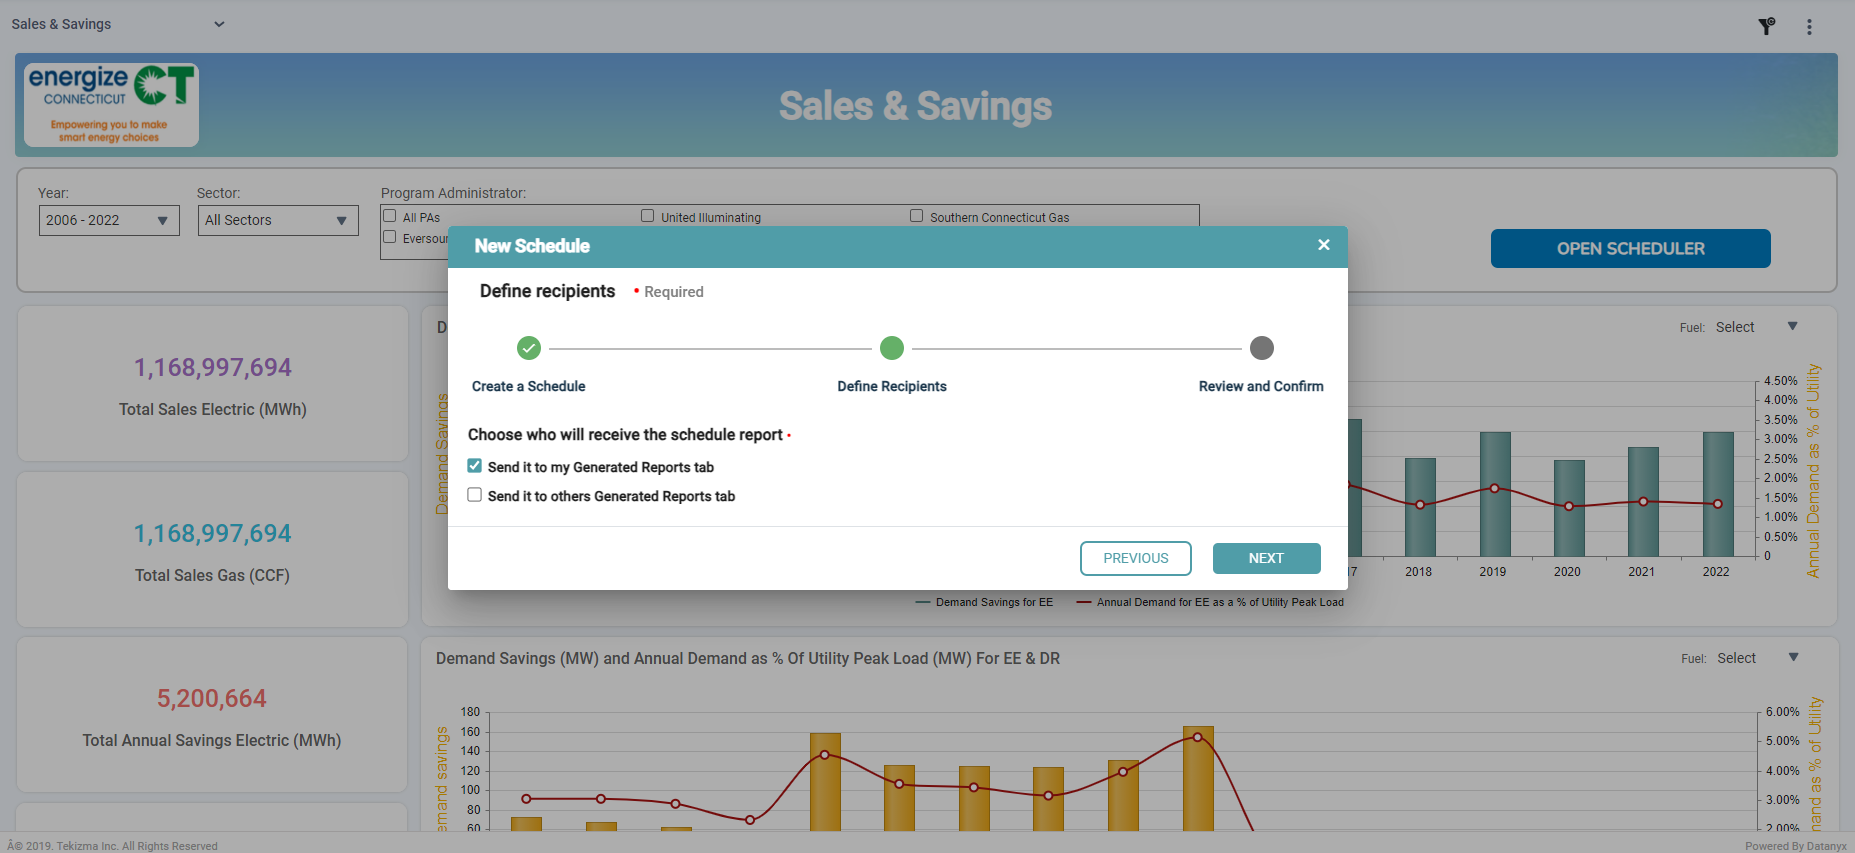
Step 4: Next, define the recipients. You can choose who will receive the scheduled report by either sending it to your Generated Reports tab (your Inbox) or to others’ Generated Reports tabs. Then, click the “Next” button. (Refer to the image below).
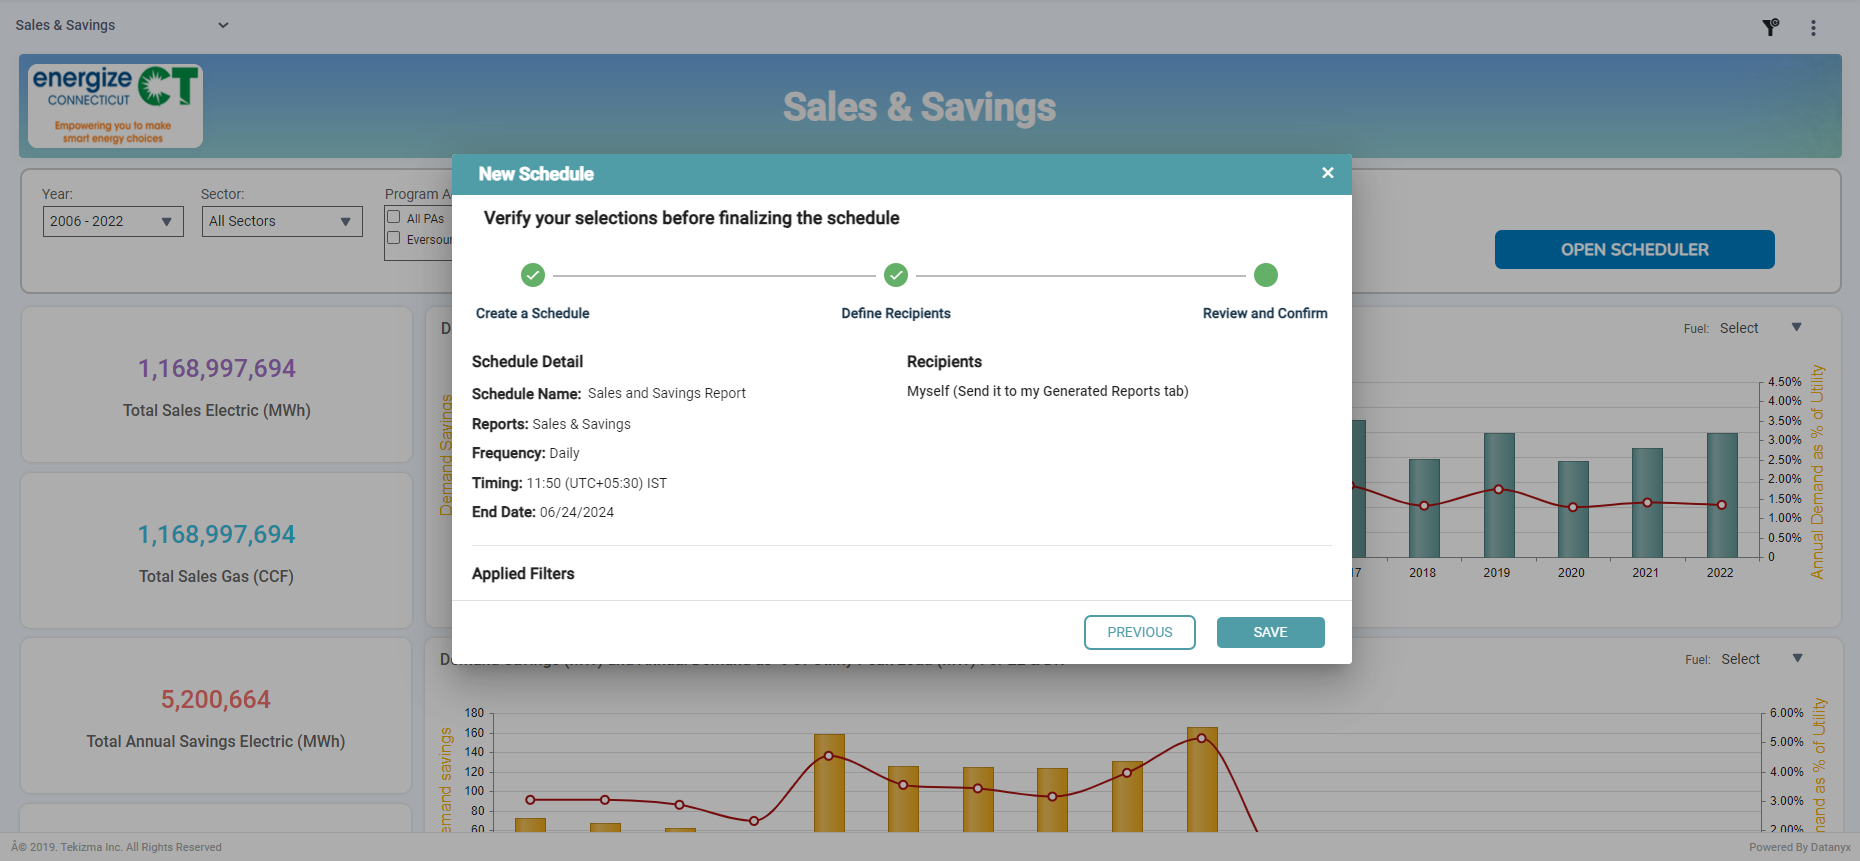
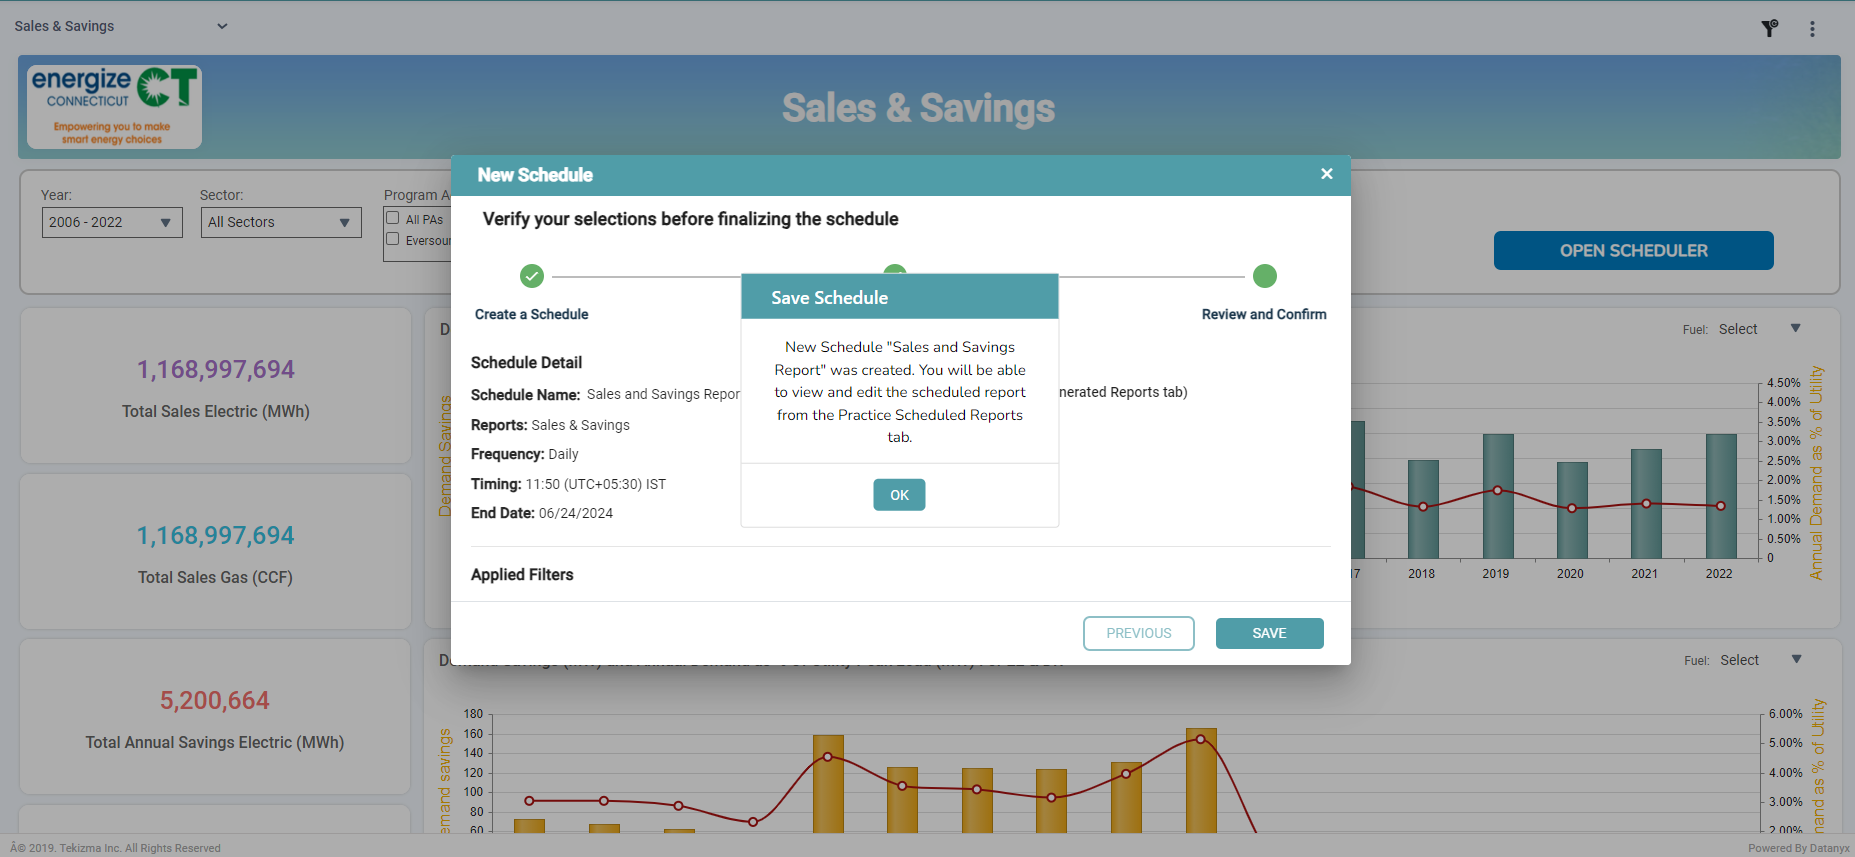
Step 5: Now, you can verify your selections before finalizing the schedule. Click on the “Save” button. (Refer to the image below).
Step 6:A “Save Schedule” pop-up will appear, indicating that you can view and edit the report from the Reports tab (Jobs Tab). Click on the Ok button. (Refer to the image below).
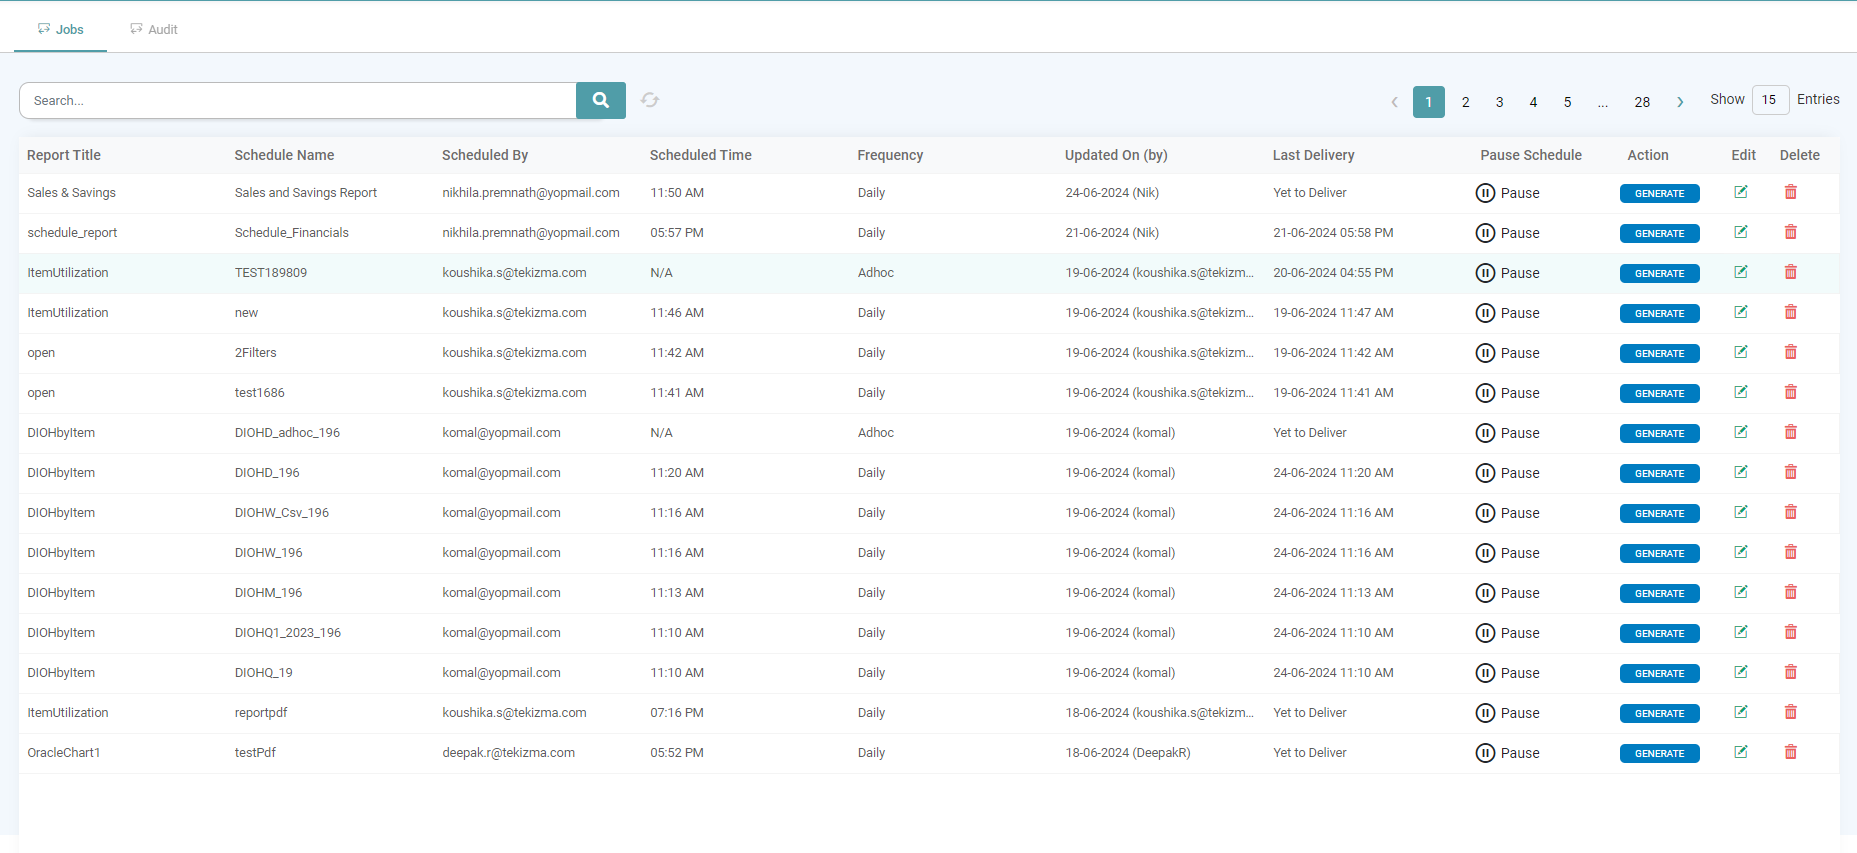
Step 7: Click on the Edit/ Delete Icons respectively to Edit or Delete the Report. The report will initially display “Yet to Deliver” as the delivery status. Once the report is delivered, the scheduled date and time will be shown. (Refer to the images below).
You can Learn more about Editing a Report Here.

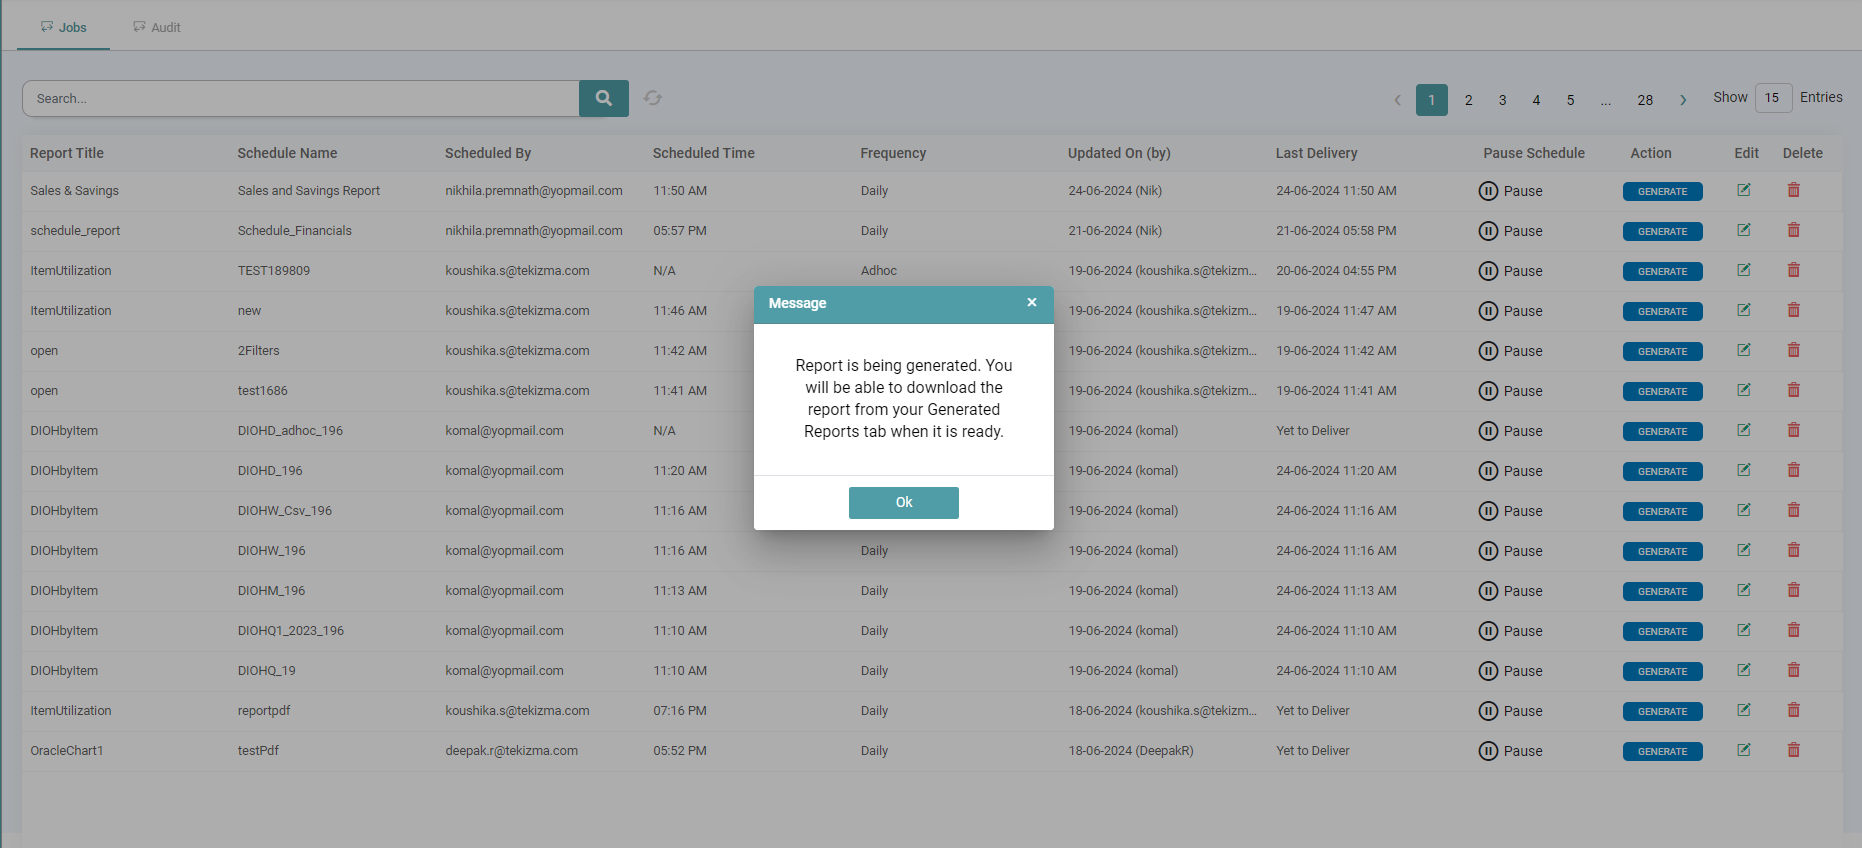
Step 8: Now, click the “Generate” button to create your report. A pop-up will appear, indicating that the report is being generated. Once it’s ready, you can download it from your Inbox. (Refer to the image below).
Step 9: Navigate to the left panel and click on “Inbox.” You can download the report by clicking the download icon. For more information about the Inbox, click on this link. (Refer to the image below).

From Scheduler Page
Step 1: Navigate to Scheduler from the main navigation menu and click the Add (+) icon in the bottom-right corner of the Scheduler window.
Step 2: In the Schedule dialog box that appears, provide the necessary details. (Refer to the image below)
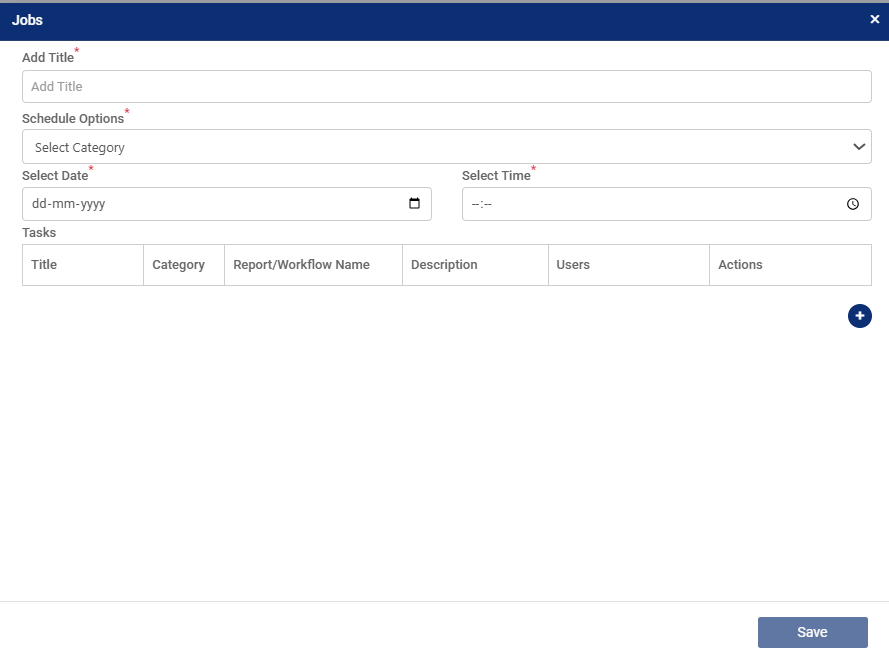
Step 3: Enter a title and configure the discussion/meeting for the selected data.
Step 4: Set the schedule options, time, date and tasks. Click on the add icon under task to add one or more tasks from the pop-up. (Refer to the image below).
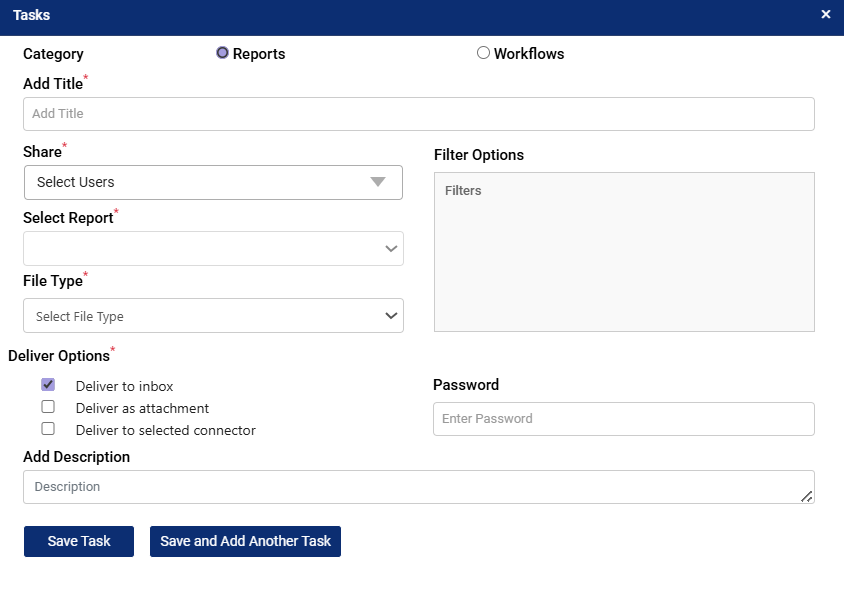
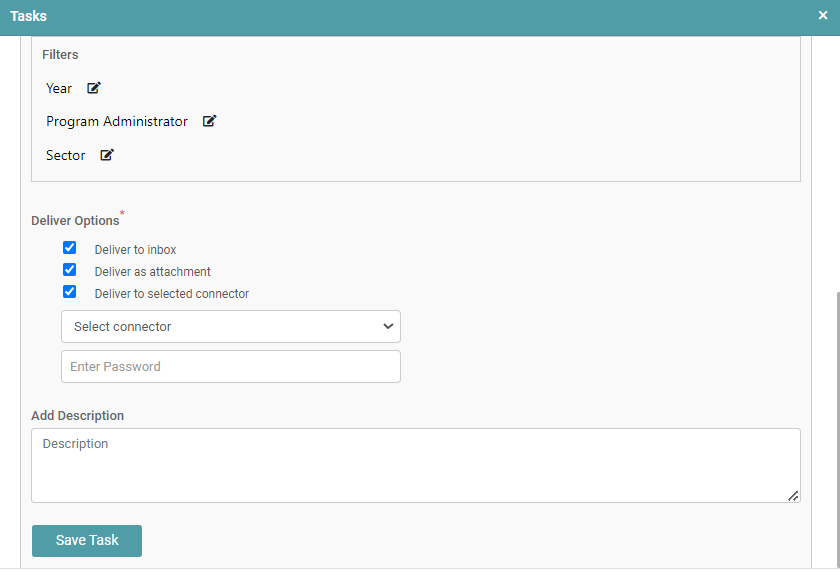
Step 5: The Tasks pop-up allows you to schedule and configure report or workflow deliveries. Follow the steps below to create a task:
- Select Category, choose the task type: Reports – to deliver a report to users. Workflows – to trigger a workflow.
- Add Title, enter a meaningful title for the task. This helps identify it later. (Required field)
- Share with Users. From the Share dropdown, select the users who should receive or have access to the scheduled report/workflow. (Required field)
- Select Report. If the task is report-based, choose the specific report you want to deliver. (Required field)
- Choose File Type. Select the format in which the report should be generated (e.g., PDF, Excel, CSV). (Required field)
- Edit Filters (Optional). Use the Filter Options from the Filter Configuration dialog box.
- Set Delivery Options. Choose how the report should be delivered:
- Deliver to Inbox – Sends the report to the selected users’ inbox.
- Deliver as Attachment – Sends the report as a downloadable file.
- Deliver to Selected Connector – Delivers the report to an integrated connector (e.g., SFTP, Azure Blob, S3).
- Add Password (Optional). Enter a password if you want to secure the delivered file. The recipient will need this password to open the report.
- Add Description (Optional). Provide additional details or context for the task in the Description field.
- Save the Task. Click Save Task to create the task.
- Click Save and Add Another Task if you want to continue creating additional tasks without closing the pop-up.
From Dashboard – Filter Panel Scheduler
Reports can be scheduled directly from the dashboard once they are created. The Filter Panel must be visible and the Scheduler option enabled.
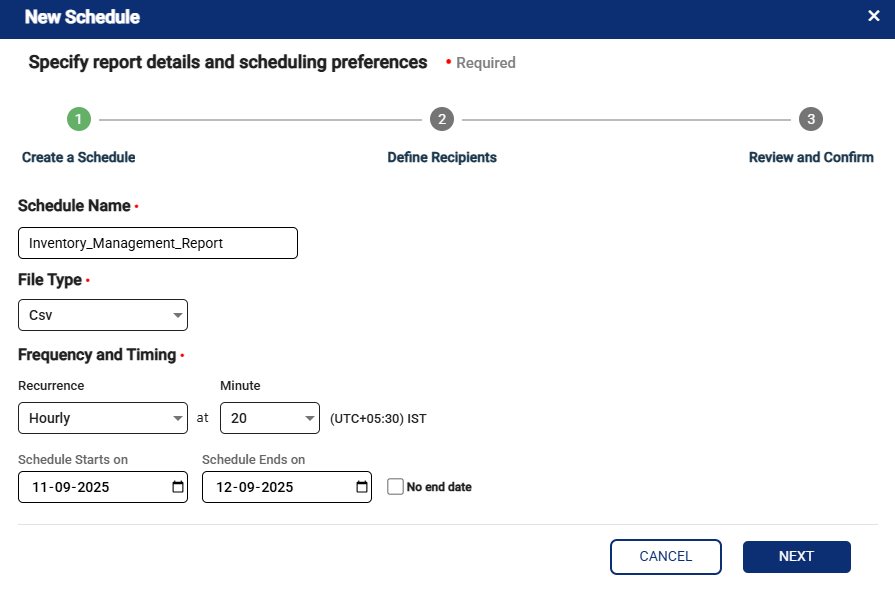
Step 1: Create a Schedule
Click on the schedule icon to start creating a new schedule. Enter the schedule name, select the required file type, and set the frequency and timing by choosing recurrence and start date. Once the details are filled, click on next. (Refer to the image below).
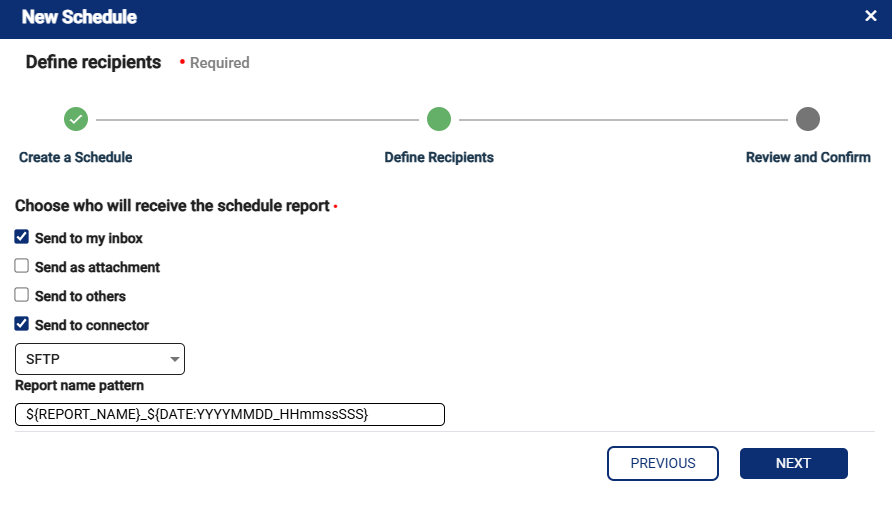
Step 2: Define Recipients
Select how the scheduled report should be delivered by choosing from the available options: send to inbox, send as attachment, send to others, or send to connector. Enter the report name pattern as required and then click on next. (Refer to the image below).
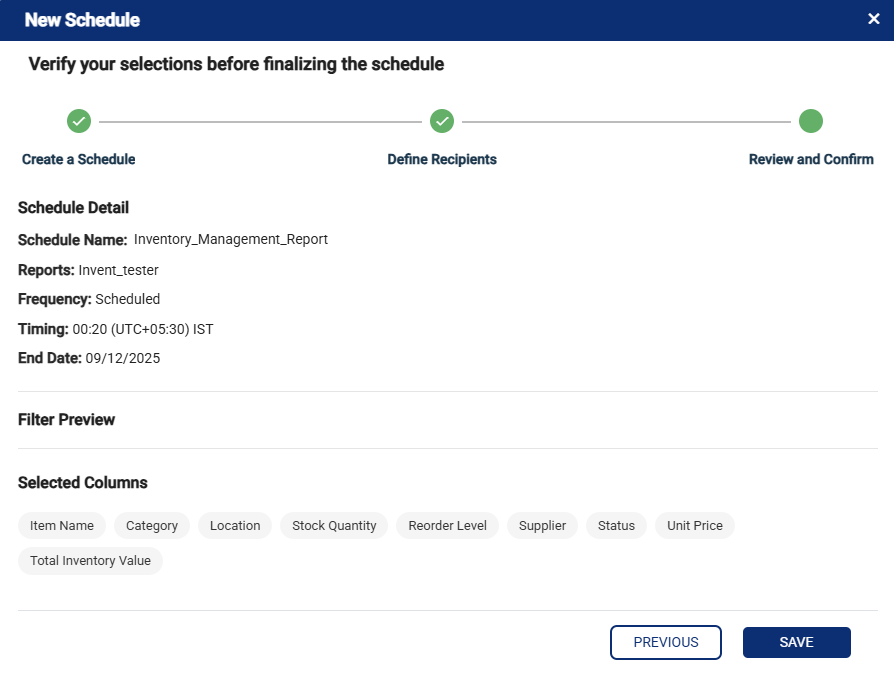
Step 3: Review and Confirm
Verify the schedule details including schedule name, selected report, frequency, timing, filters applied, and selected columns. Once reviewed, click on save to complete the schedule creation. (Refer to the image below).
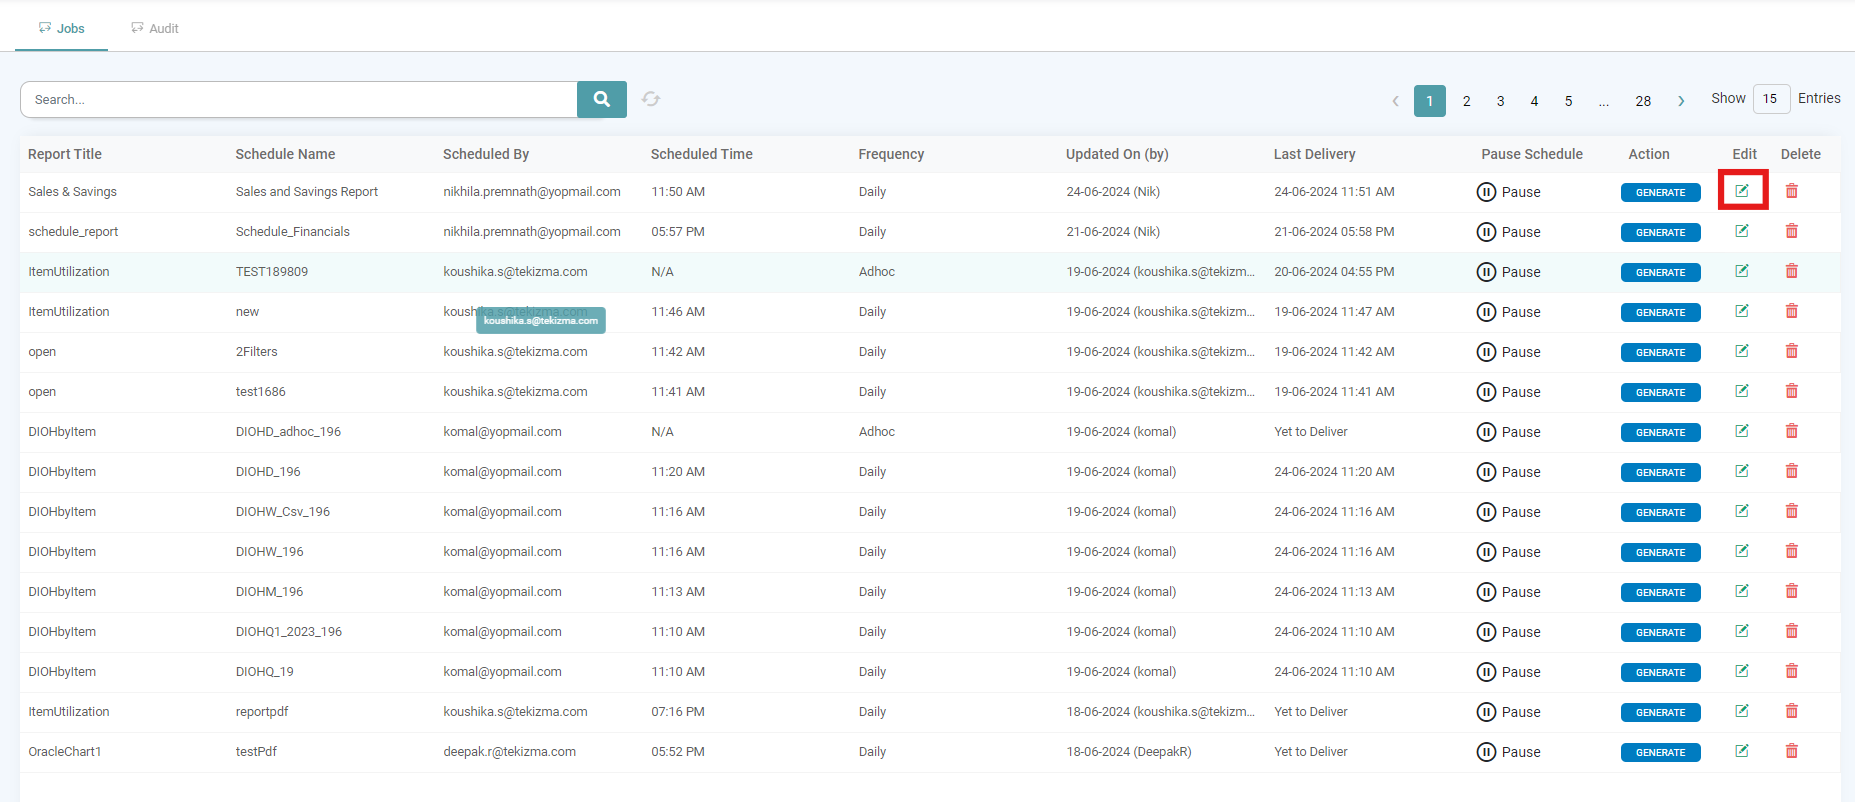
Edit
Step 1: Click the “Edit” icon located under Edit. (Refer to the image below).
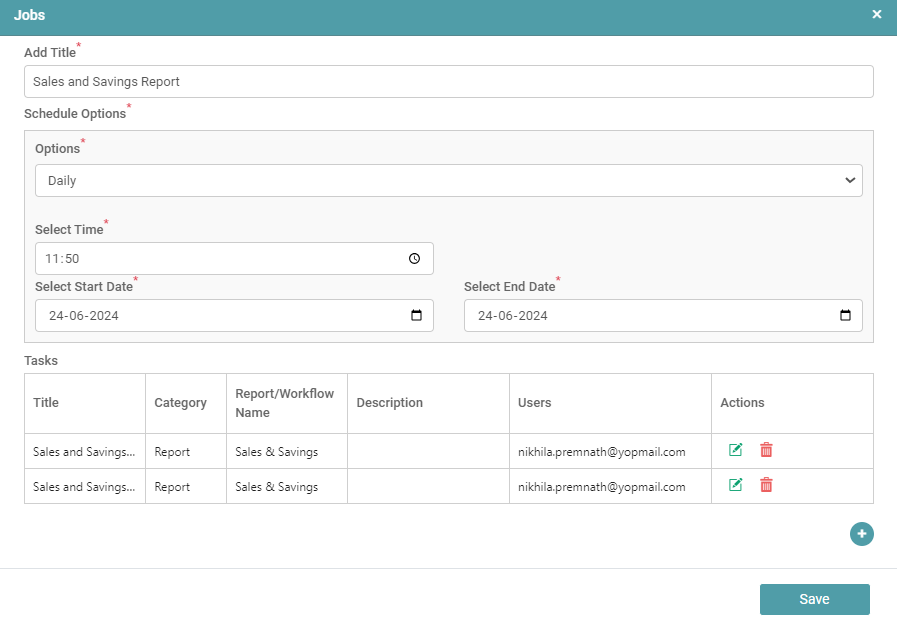
Step 2: In the Jobs dialog box that appears, the user can edit the job title, schedule the job by selecting the category required from the category list, select the date and the time for the job.
Step 3: You can also Edit the Task or Delete the Task. (Refer to the image below).
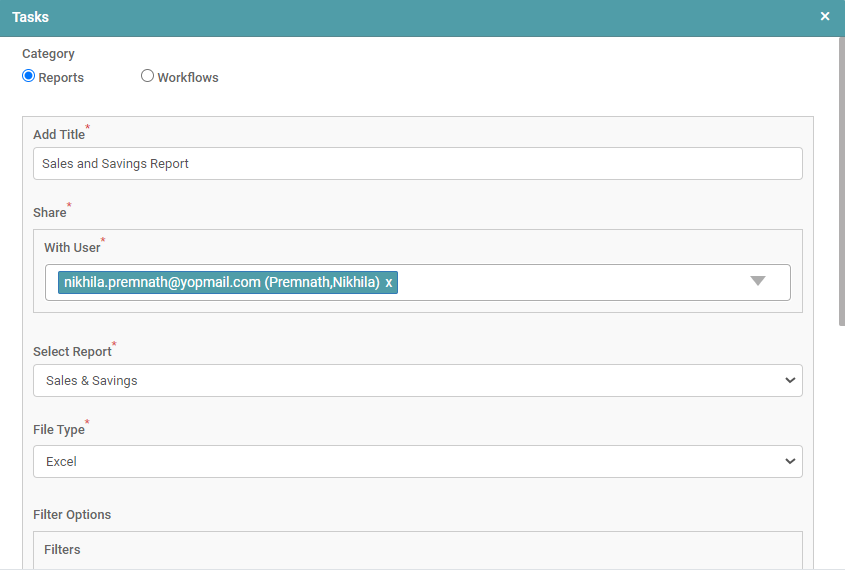
Step 4: Click on the “Edit Task” icon under Tasks. A Tasks dialog box appears. Here, you can Edit the category between Report and/ or workflow.
Step 5: In the scenario where “Report” has been selected, add the title of the task, select the users with whom you want to share the report with.
Step 6: Select the report and Select the file type between PDF, Excel and CSV. (Refer to the image below).
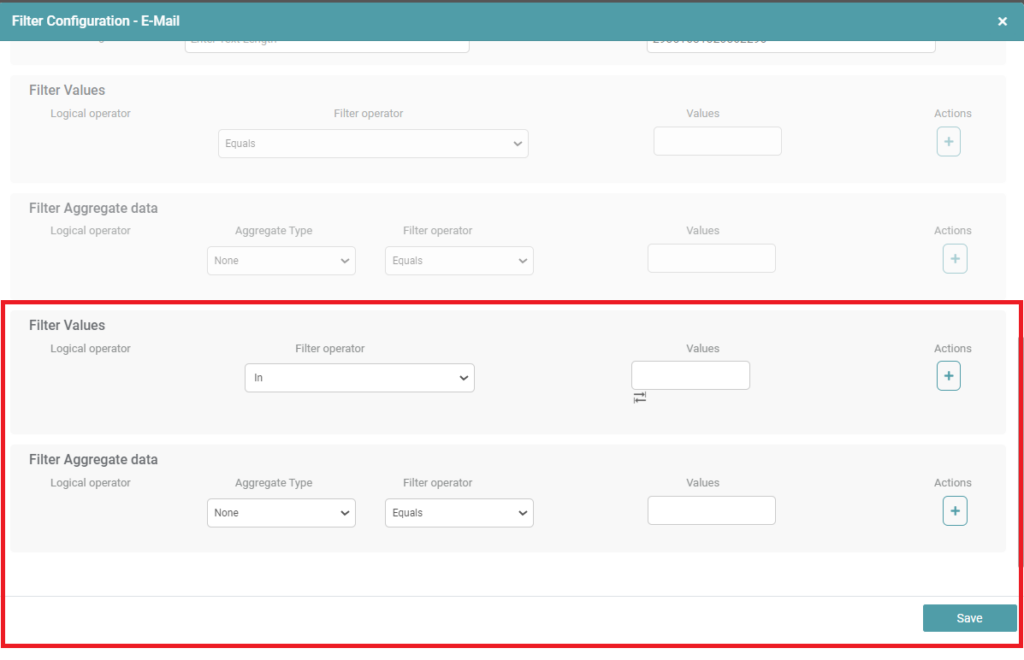
Step 7: The filter options will be displayed only for those dashboards that have filters on them.
Step 8: When you click on the Edit icon next to the filters, the filter configuration dialog box appears. You can also set a logic for those filters.
Step 9: Once the necessary changes have been made, click on the save icon and you will be directed to the previous “tasks” dialog box. (Refer to the image below).
Step 10: You can now set the delivery options which are as below:
- Deliver to Inbox – The report will be sent to the inbox of the selected users.
- Deliver as attachment – This requires you to give a password. The password will be used by those users to access the report.
- Deliver to selected connector – Select the Connector and enter the password.
Step 11: You can add a description and click on the save task button. (Refer to the image below).
Step 12: The Task or Tasks you have configured will be listed under Tasks. Click on the save button. (Refer to the image below).
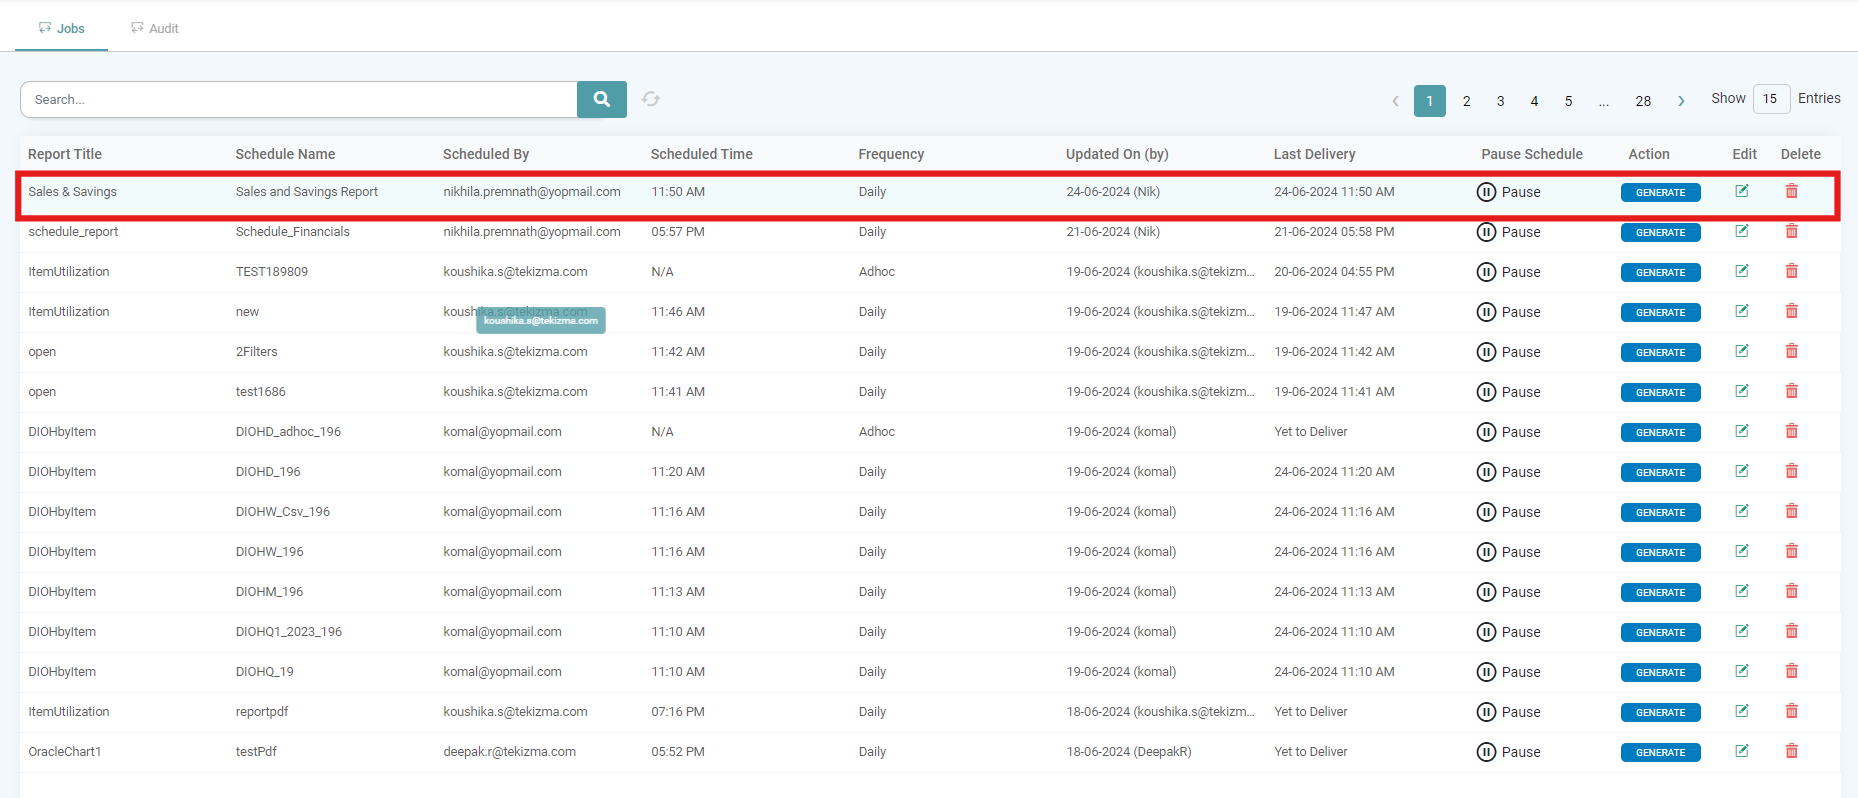
Step 13: The Task will now be displayed in the task tab of scheduler.
Step 14: The details about the Report Title, Schedule Name, Scheduled By, Scheduled Time, Frequency, Updated On (by), Last Delivery, Pause Schedule, Action, Edit and Delete will be available to the user. (Refer to the image below).
Audit
In the Audit tab, you can see the list of jobs along with their details such as Job ID, Task ID, Widget ID, Title, File Type, Status, Created On, and Updated On. (Refer to the image below).

You can look at the scheduled task by entering the Job ID or the Job Title.
If a job fails, the Status will show as Failed. When you hover over the failed job, the system displays the error message for that job. (Refer to the image below).
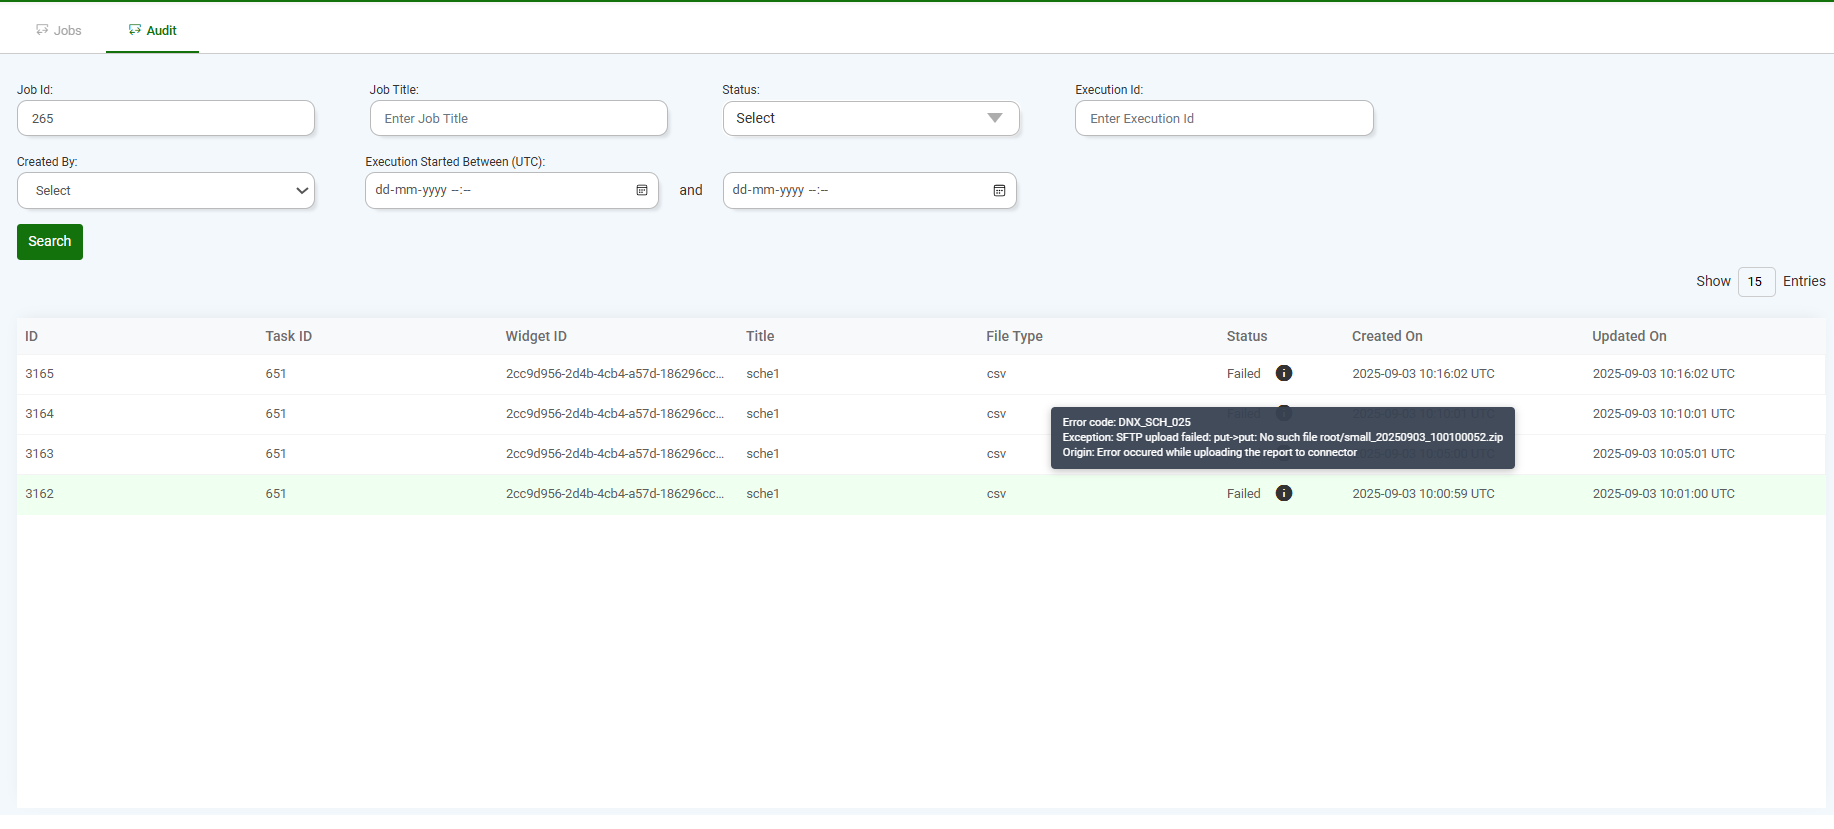
Below is an example of the error messages you may see:
DNX_RPT_014: “Error occurred while generating Excel report”,
DNX_RPT_015: “Error occurred while processing report data”,
DNX_RPT_016: “Error occurred while applying filters to report”,
DNX_RPT_017: “Error occurred while executing report query”,
DNX_RPT_018: “Error occurred while creating Excel workbook”,
DNX_RPT_019: “Error occurred while processing chart data”,
DNX_RPT_020: “Error occurred while generating CSV file”,
DNX_SCH_022: ‘Error occurred while generating report’,
DNX_SCH_023: ‘Error occurred while updating the inbox’,
DNX_SCH_024: ‘Error occurred while sending the report as an attachment’,
DNX_SCH_025: ‘Error occurred while uploading the report to connector’,
This helps you quickly identify the reason for failure and take corrective actions.